

This Article is a series that will explore setting up a Sitecore Commerce site and development environment with some code snippets showcasing what Sitecore Commerce can do and how it can be used effectively with ease.
Prerequisites to setting up Commerce Server website is to have followed the steps under Sitecore Commerce Diary 1 located at:
http://xcentium.com/blog/2016/08/16/sitecore-commerce-diary---1-installing-commerce-server-for-sitecore-commerce
Lets get started:
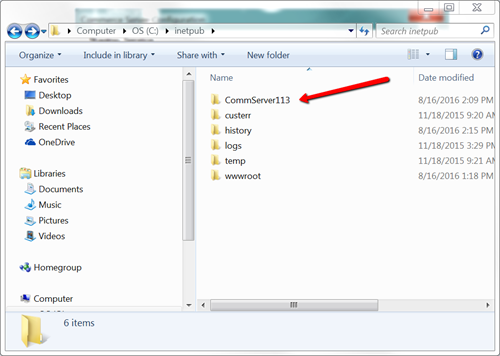
Step 1: Create a folder named say CommServer113 under say C:\inetpub
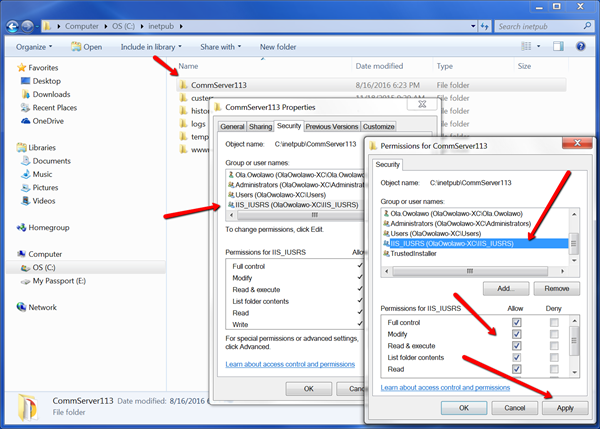
Step 2: Set ACL permission on the new folder CommServer113 to grant all rights to the group IIS_IUSRS Note we are granting all rights because this is just development machine not production.
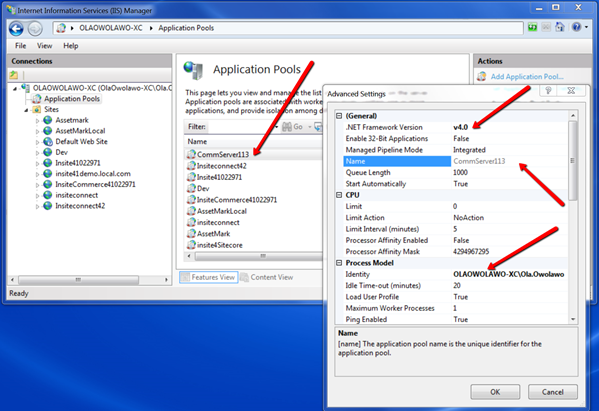
Step 3: Go to IIS and create a new App_Pool named say CommServer113 set the framework to v4.0 and under identity select custom and set your windows account username and password.
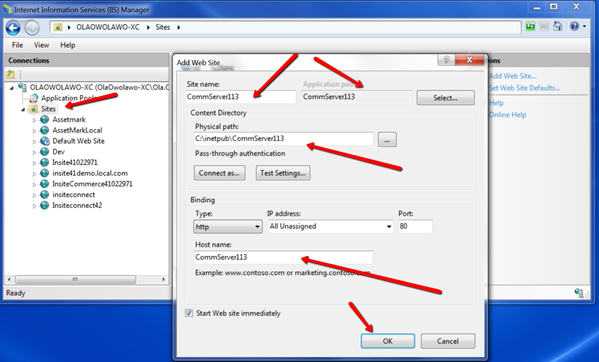
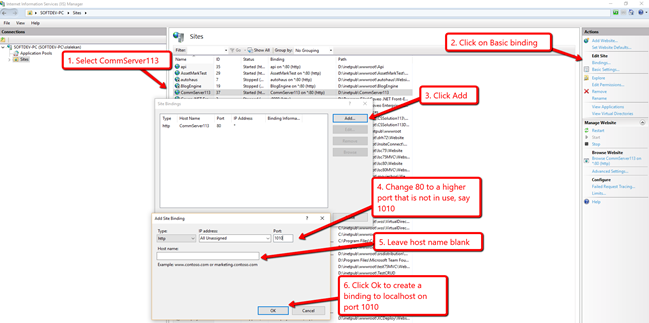
Step 4: Under IIS Sites, add a new website named CommServer113 , set its path to C:\inetpub\CommServer113 and set its app_pool to the one created under step 3 above.
Step 5: Open your host file under C:\Windows\System32\drivers\etc and add the following as the last line.
127.0.0.1 CommServer113
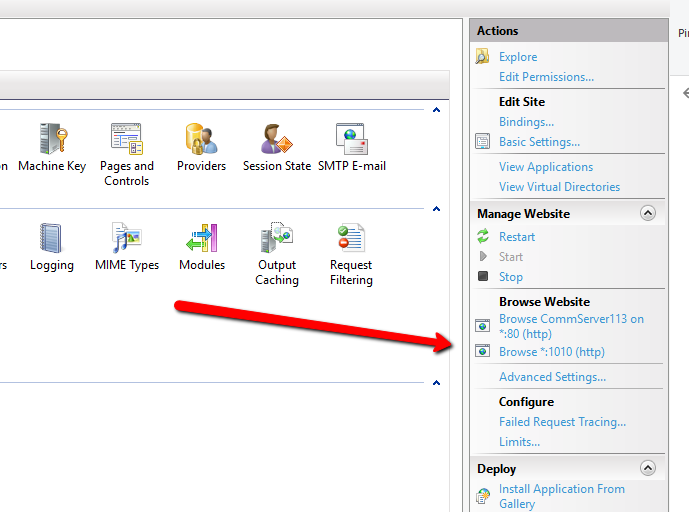
Step 5a: Create another binding for CommServer113 to localhost on an unused port say 1010 so that it can be browsed by visiting http://localhost:1010/ as shown below
When done you will have:
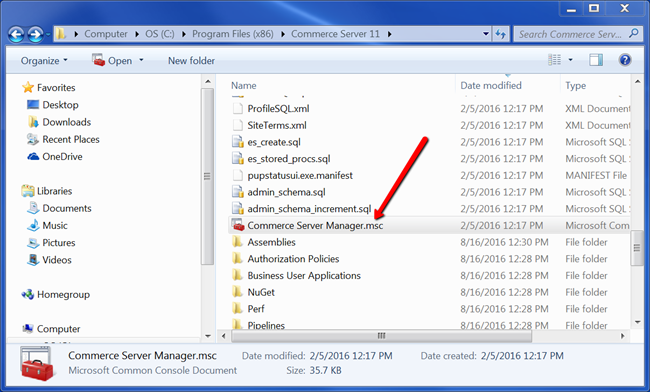
Step 6: Open windows explorer and navigate to C:\Program Files (x86)\Commerce Server 11 run Commerce Server Manager.msc as Administrator.
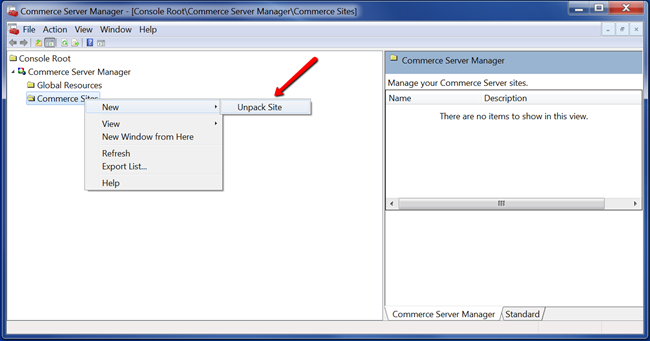
Step 7: Right click on Commerce Site and click new, then click Unpack Site. Explorer will open up. Navigate to C:\Program Files (x86)\Commerce Server 11\Pup Packages and select CSharp.pup and click open.
Step 8: In the next window, select Quick unpack and click next.
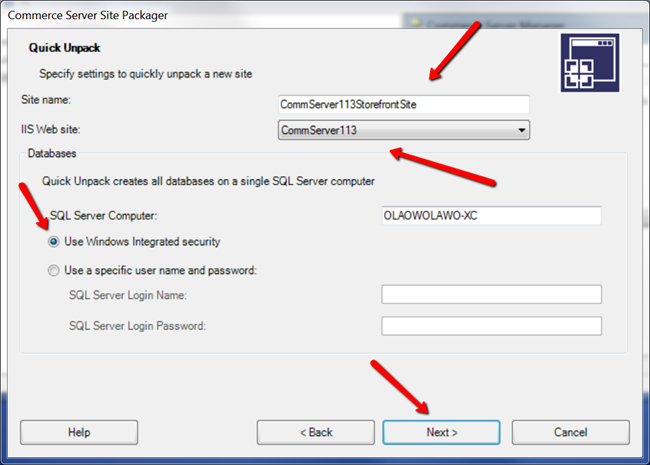
Step 9: Set site name as CommServer113StorefrontSite, IIS Website to CommServer113 previously created, set SQL Server computer to your local SQL instance name and use windows authentication. You may use username and password otherwise. Click Next.
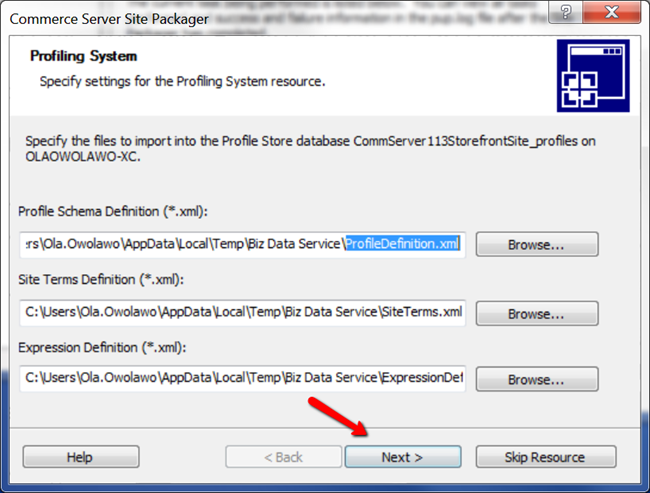
Step 10: Unpacking window will popup, then another profiling window will popup after that. Accept default by clicking next.
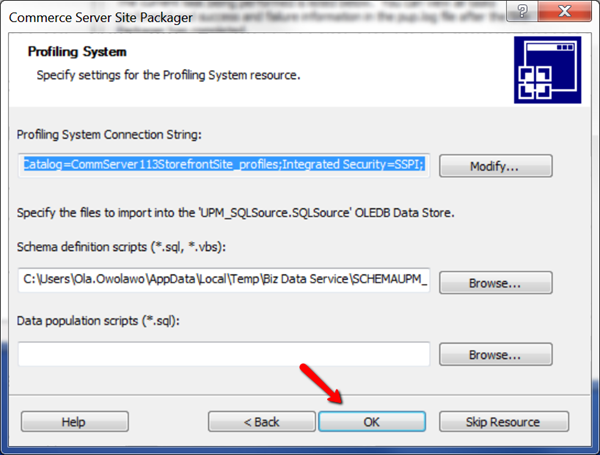
Step 11: Another screen will popup, click Ok to accept the default settings and the setup will proceed.
Step 12: Click Ok to proceed.
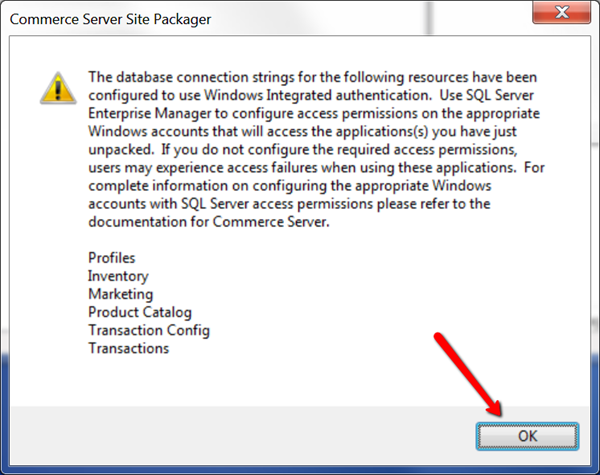
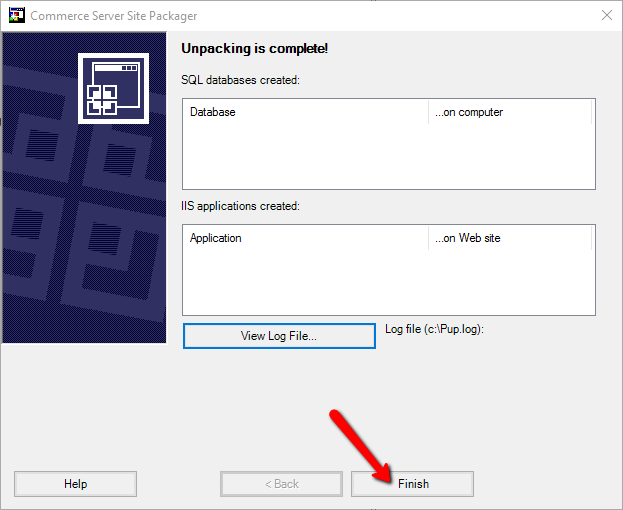
Step 13: Click Finish to complete the setup. If there were errors, you can check c:\pup.log for details.
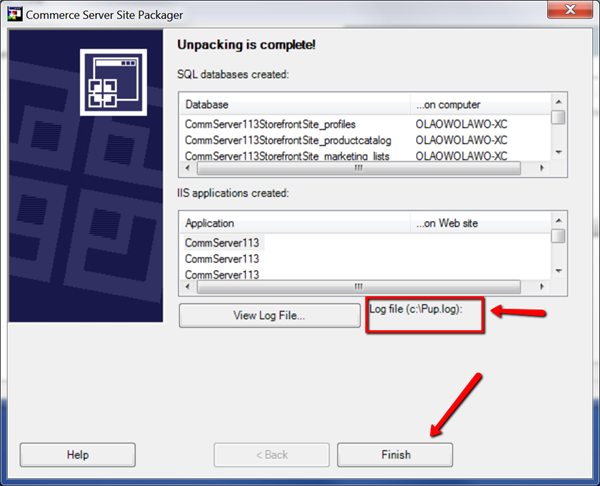
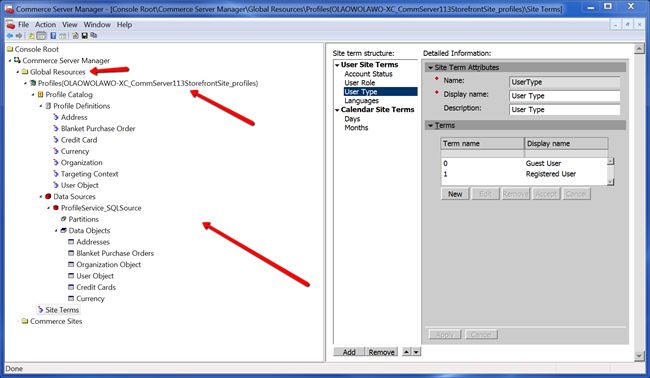
Step 14: When done, right click on Commerce Server Manager and refresh. Then, expand Commerce Server Manager , then expand Global Resources to see all.
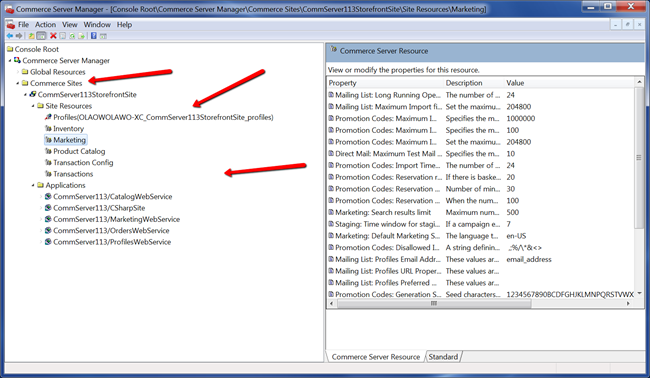
Step 15: You may also expand Commerce Sites to see all the resources and applications created.
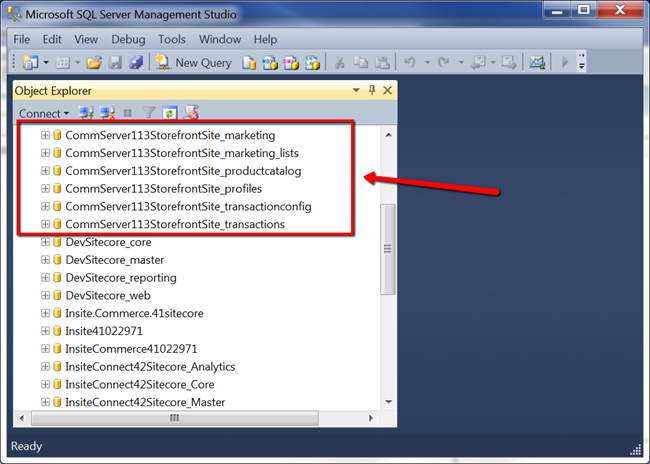
Step 16: Open SQL server Management Studio and you should see the newly created databases for CommServer113StorefrontSite .
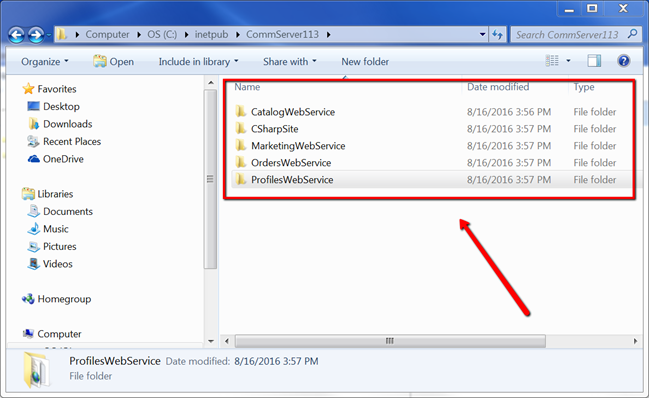
Step 17: If you navigate to C:\inetpub\CommServer113 , you will see the new web services sites folders created.
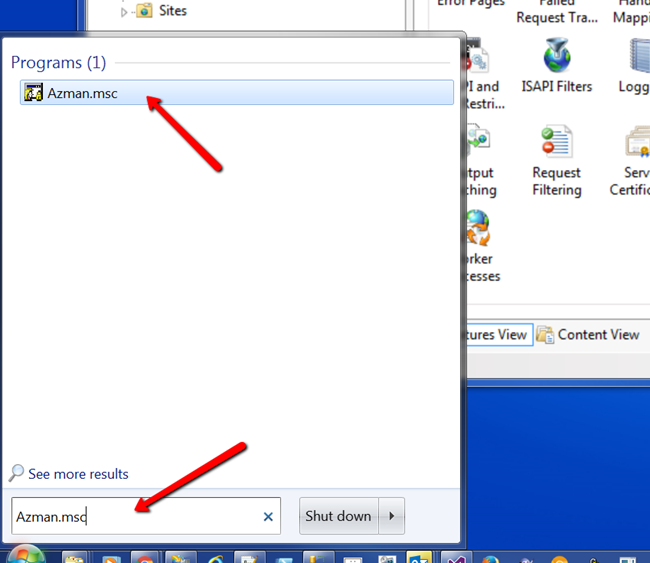
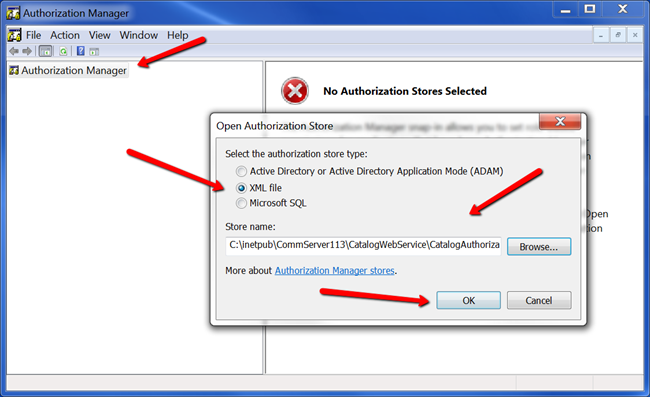
Step 18: It is time to set up authorization. Click Windows key + R and type Azman.msc . Right click on Azman.msc and run as administrator to load the Authorization manager.
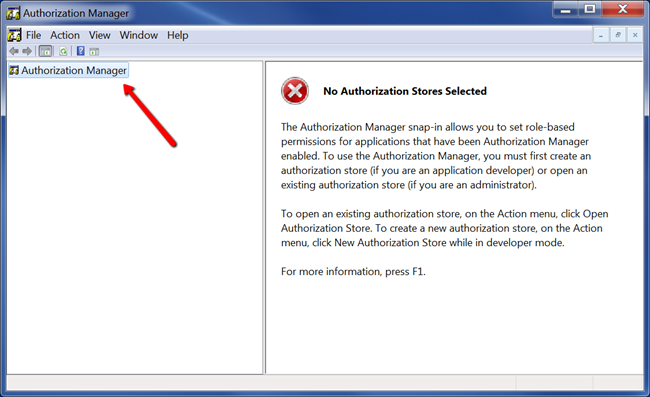
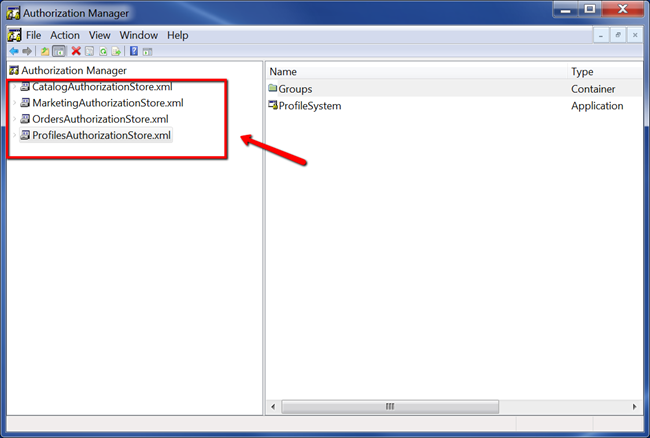
Step 19: We need to load the following files into the Authorization store so that you can authorize yourself to administer with Commerce server through the web services.
The XML files you need to load are:
- C:\inetpub\CommServer113\CatalogWebService\CatalogAuthorizationStore.xml
- C:\inetpub\CommServer113\MarketingWebService\MarketingAuthorizationStore.xml
- C:\inetpub\CommServer113\OrdersWebService\OrdersAuthorizationStore.xml
- C:\inetpub\CommServer113\ProfilesWebService\ProfilesAuthorizationStore.xml
To add them one at a time, you right click on Authorization Manager , select Open Authorization Store , select XML file and browse to each xml file and click OK
Step 20: Expand the newly added CatalogAuthorizationStore.xml and under Role Assignments add your windows account to CatalogAdministrator and Administrator .
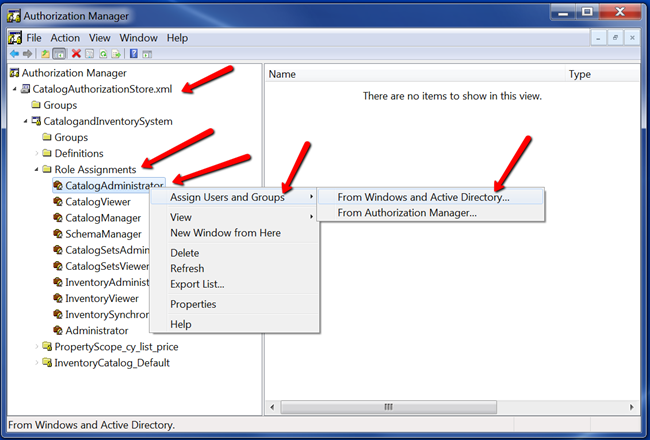
Make sure you add your windows user account to Administrator as well
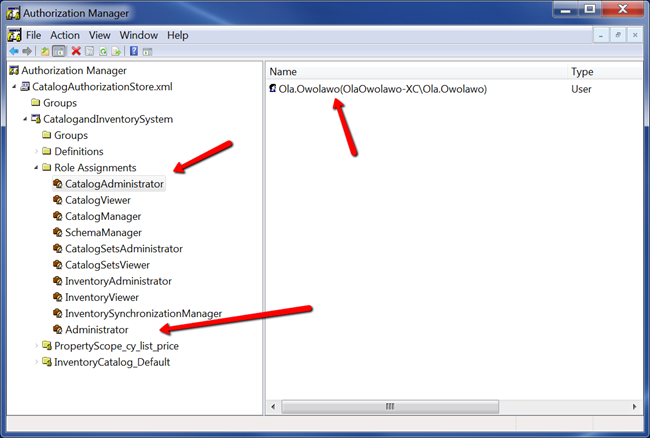
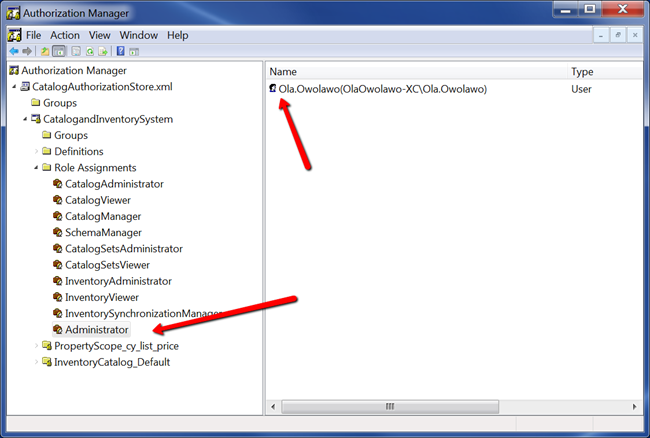
After adding all the four authorization store XML files listed on this step, you should have this:
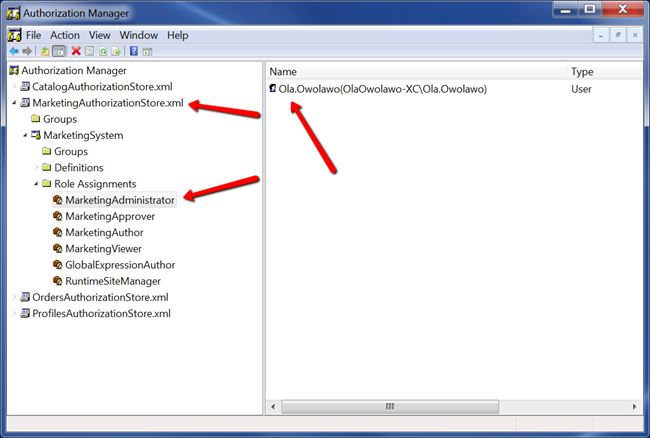
Step 21: To MarketingAuthorizationStore.xml Add your windows account to MarketingAdministrator under Role Assignments .
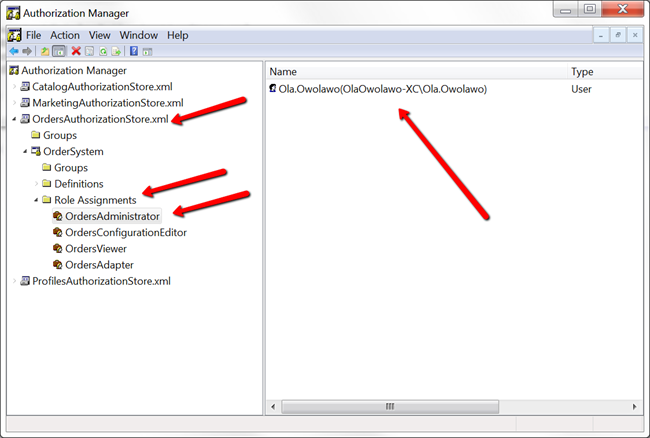
Step 22: To OrdersAuthorizationStore.xml Add your windows account to OrdersAdministrator under Role Assignments .
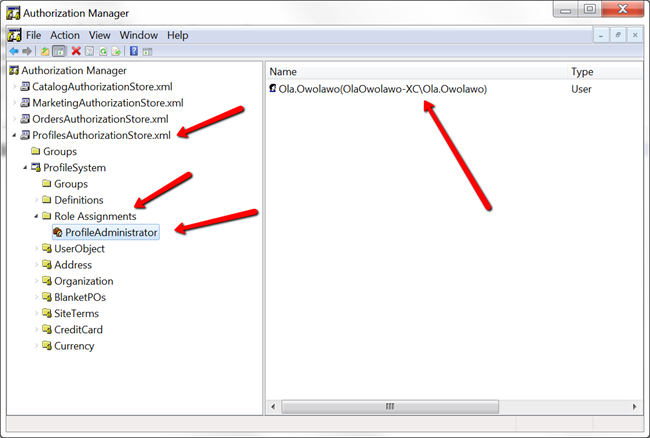
Step 23: To ProfilesAuthorizationStore.xml Add your windows account to ProfilesAdministrator under Role Assignments .
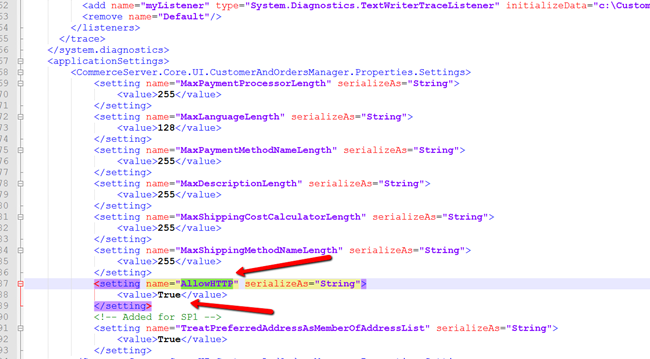
Step 24: Use explorer to navigate to C:\Program Files (x86)\Commerce Server 11\Business User Applications and edit CustomerAndOrdersManager.exe.config set the value of AllowHTTP
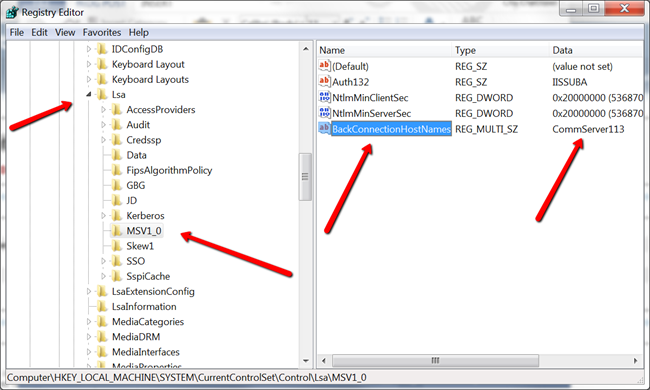
Step 25: Disable loopback check for CommServer113 by following method 1 as described at https://support.microsoft.com/en-us/kb/896861 as follows:
Run Regedit.exe as Administrator, go to HKEY_LOCAL_MACHINE\SYSTEM\CurrentControlSet\Control\Lsa\MSV1_0 .
Right-click MSV1_0, point to New, and then click Multi-String Value.
Type BackConnectionHostNames, and then press ENTER.
Right-click BackConnectionHostNames, and then click Modify.
In the Value data box, type CommServer113, and then click OK.
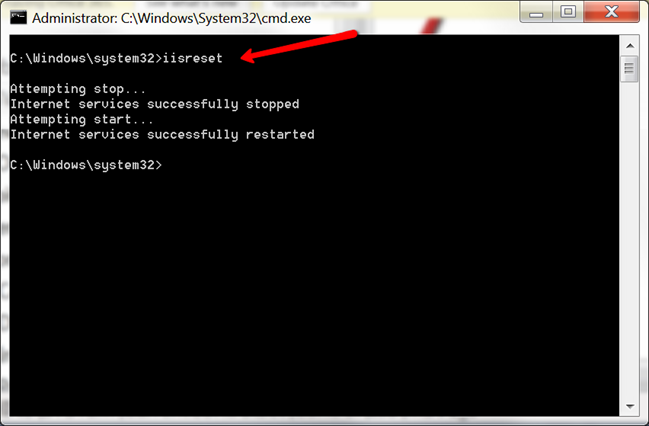
Quit Registry Editor, and then open CMD as administrator and do IISReset
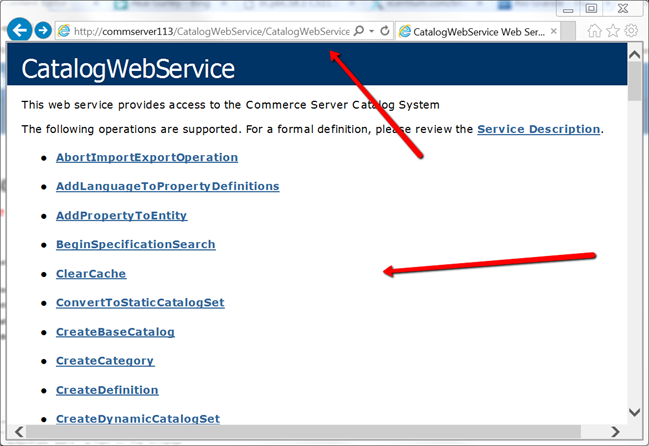
Step 26: Open Chrome or Internet Explorer or any browser you prefer and try browsing to : http://commserver113/CatalogWebService/CatalogWebService.asmx .
If prompted to login (Ideally, if you did step 25 right, you should not be prompted), use your windows credentials and tick remember my credentials, then click login.
You should see the site working:
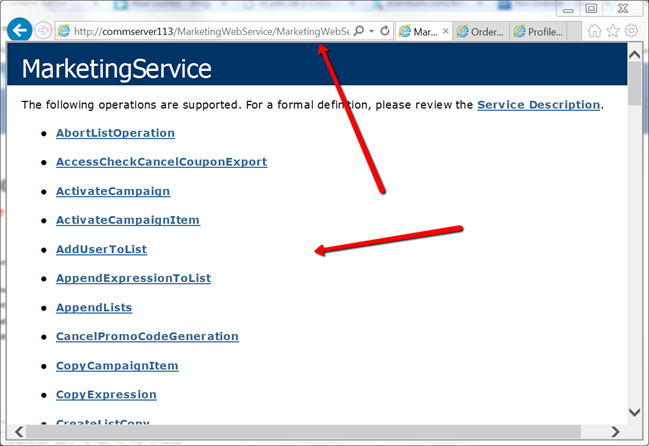
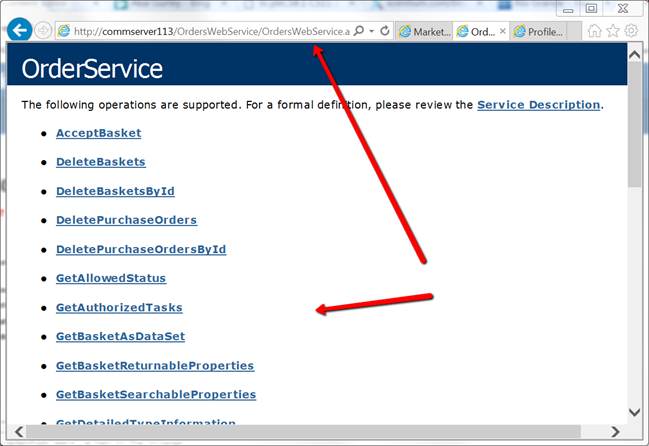
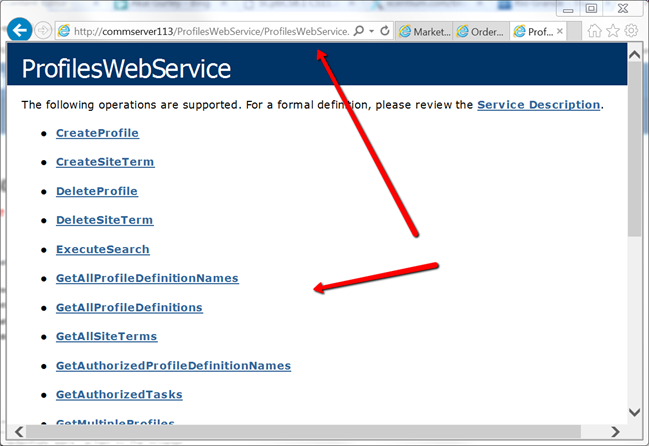
Step 27: Browse the other following storefront webserves to ensure they all work. The urls to browse are:
- http://commserver113/MarketingWebService/MarketingWebService.asmx
- http://commserver113/OrdersWebService/OrdersWebService.asmx
- http://commserver113/ProfilesWebService/ProfilesWebService.asmx
Step 28: Go to Sql Server Management Studio and run the following SQL commands to adjust Commerce server database for Sitecore s use:
ALTER TABLE [CommServer113StorefrontSite_profiles].[dbo].[CreditCards] DROP COLUMN [u_expiration_date]
ALTER TABLE [CommServer113StorefrontSite_profiles].[dbo].[CreditCards] ADD [i_expiration_month] [int] NOT NULL
ALTER TABLE [CommServer113StorefrontSite_profiles].[dbo].[CreditCards] ADD [i_expiration_year] [int] NOT NULL
DROP INDEX [dbo].[UserObject].[Idx_UserObject_emailaddress]
ALTER TABLE [CommServer113StorefrontSite_profiles].[dbo].[UserObject] ALTER Column [u_email_address] [nvarchar](64) NULL
ALTER TABLE [CommServer113StorefrontSite_profiles].[dbo].[UserObject] ADD [u_preferred_shipping_method] [nvarchar](50) NULL
ALTER TABLE [CommServer113StorefrontSite_profiles].[dbo].[UserObject] ADD [u_default_shopper_list] [nvarchar](50) NULL
ALTER TABLE [CommServer113StorefrontSite_profiles].[dbo].[UserObject] ADD [u_external_id] [nvarchar](256) NOT NULL
ALTER TABLE [CommServer113StorefrontSite_profiles].[dbo].[UserObject] ADD [u_comment] [nvarchar](256) NULL
DROP INDEX [dbo].[UserObject].[IX_UserObject_ExternalId]
CREATE UNIQUE NONCLUSTERED INDEX [IX_UserObject_ExternalId] ON [CommServer113StorefrontSite_profiles].[dbo].[UserObject]
(
[u_external_id] ASC
)
WITH (PAD_INDEX = OFF, STATISTICS_NORECOMPUTE = OFF, ALLOW_ROW_LOCKS = ON, ALLOW_PAGE_LOCKS = ON, IGNORE_DUP_KEY = OFF) ON [PRIMARY]
GO
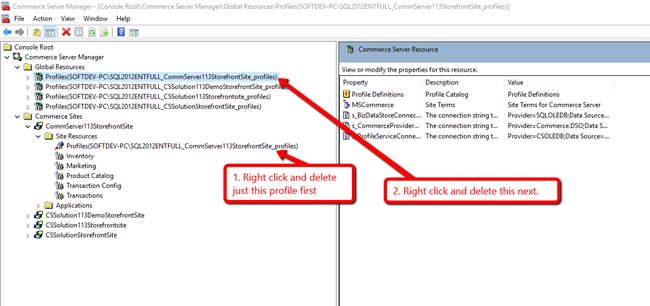
Step 29: We need to rebuild the profile and profile mappings. Go to C:\Program Files (x86)\Commerce Server 11 right click Commerce Server Manager.msc and open as Administrator as described in step 6 above,
then expand Console Root / Commerce Server manager/ Commerce Sites / CommServer113StoreFrontSite / Site Resources
Also expand Console Root / Commerce Server manager / Global Resources /
First, Right click on Profiless(xxx .) under Site Resources and delete it.
Second Right click on Profiless(xxx .) under Global Resources and delete it.
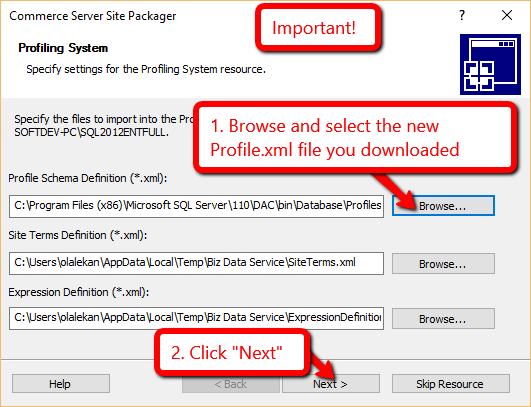
Step 30: Download the updated profile.xml from the link below and save it where you can easily get to it. We are going to use it to create the new profile and property mappings for Sitecore to work with Commerce server profile.
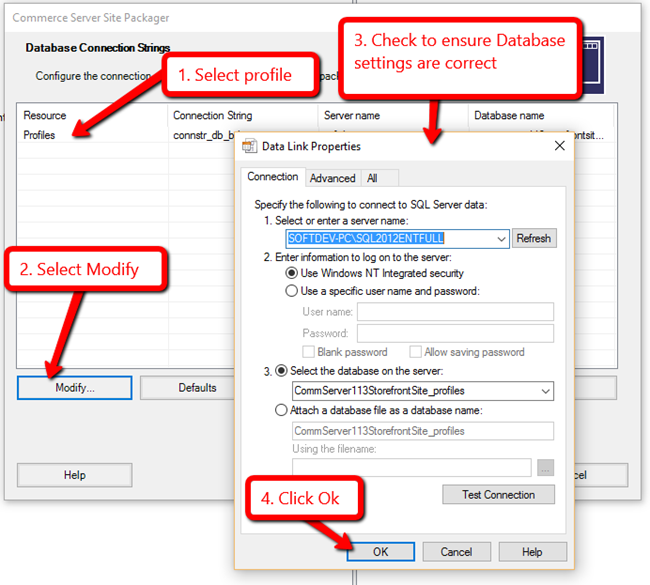
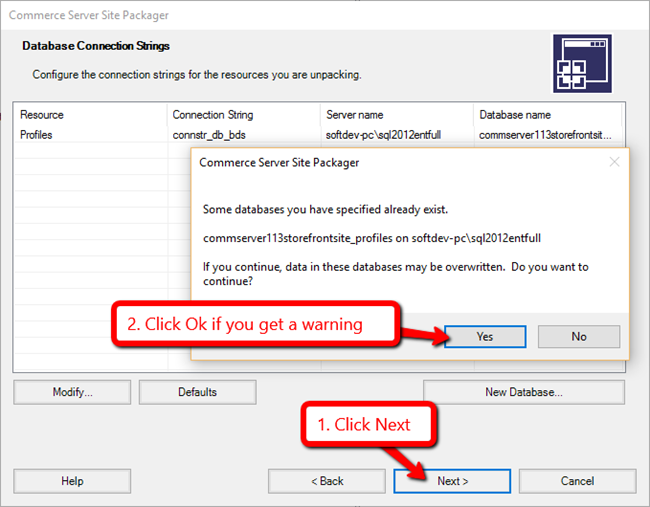
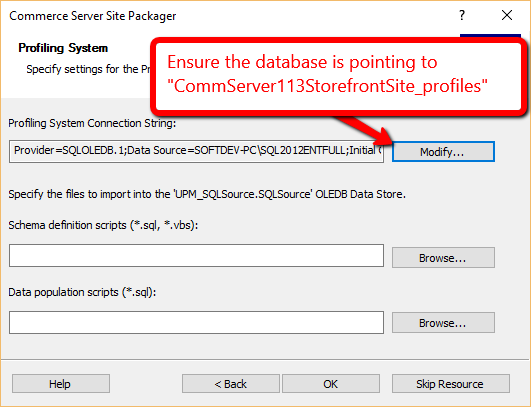
Step 31: Right click on Site Resources from step 29 above and select New Add Resource , navigate to C:\Program Files (x86)\Commerce Server 11\Pup Packages and select CSharp.pup click open and a select profiles on the select resources popup click Add and click Next.
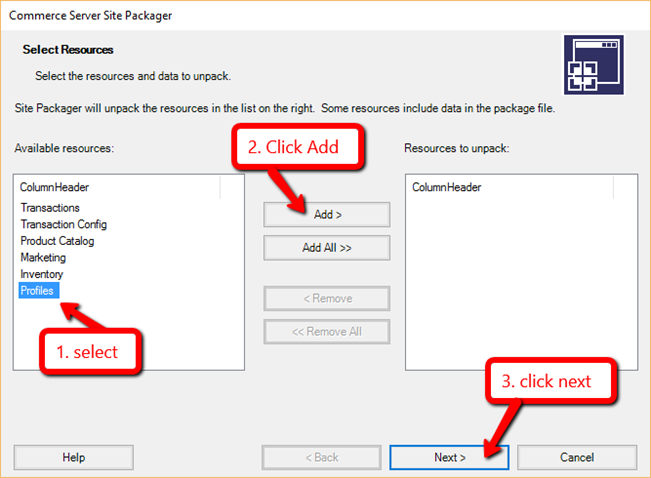
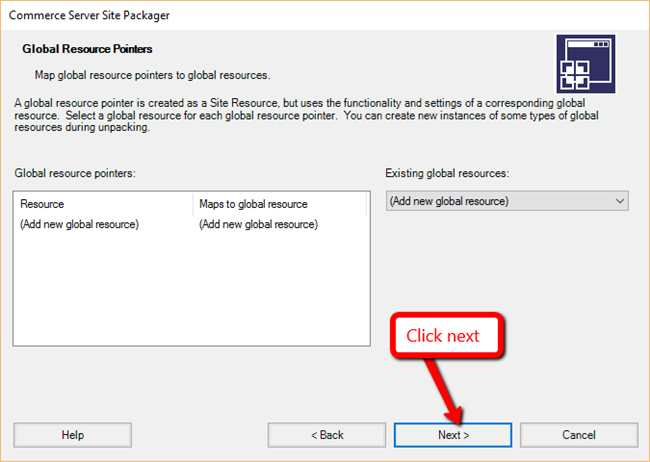
Click Next to proceed.

Step 32: We need refresh. Go to C:\Program Files (x86)\Commerce Server 11 right click Commerce Server Manager.msc and open as Administrator as described in step 6 above,
Right click on Commerce Server Manager and click refresh
then expand Console Root / Commerce Server manager/ Commerce Sites / CommServer113StoreFrontSite / Site Resources
Also expand Console Root / Commerce Server manager / Global Resources /
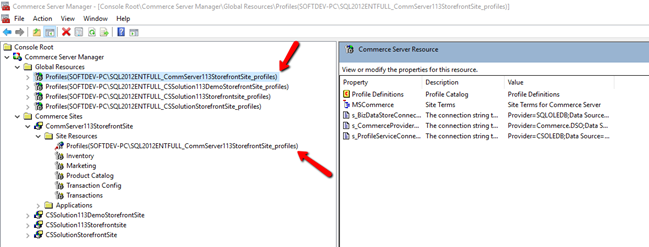
You will see that the profiles have been recreated and mapped are all done.
In Sitecore Commerce Diaries: 3, we will create the Sitecore 8.1 Site for the Commerce Server site.