

There are quite a few guides on installing Sitecore Experience Commerce 9 at this point, including Sitecore's own installation guide, but even with all this information it too me a while to get it to work right and I know I'm not the only one who found install process a bit more challenging than expected. Now, having installed and configured SXC9 a couple dozen times, I thought I should share my install script, which now works reliably for me and others.
This guide explains how to install both standalone Sitecore Experience Platform 9.0.2 and then Sitecore Experience Commerce 9.0.2 on top of it on a clean environment. If you already have Sitecore 9.0.2 installed and wish to proceed to "Install Sitecore Commerce 9.0.2" section, you can, but please make sure you have all pre-requisites installed and then make sure to update and double-check all parameters in"Deploy-Sitecore-Commerce-dev.ps1" (my version of original "Deploy-Sitecore-Commerce.ps1" script), this can save you from unexpected and sometimes hard to troubleshoot issues during and after the install. And one more thing: Sitecore Experience Commerce 9.0.2 can only be installed with Sitecore 9.0.2 - it will not work with prior versions.
If you're lucky and don't get any issues during install then entire process will take about an hour, but it's your first install, it might take longer than that...
Part 1. Install Sitecore 9.0.2
Instal Pre-requisites
- Make sure you have .NET Framework 4.6.2 Developer Pack installed
- Install Microsoft SQL server 2016 SP1
- Developer edition is what I usually use for local install. If you have MSDN Subscription you can head to https://my.visualstudio.com/ or just google for "download SQL Server 2016". It's possible to get SQL Server 2017 to work with Sitecore and Commerce 9, but this will require some tweaking,aking and I won't cover it here.
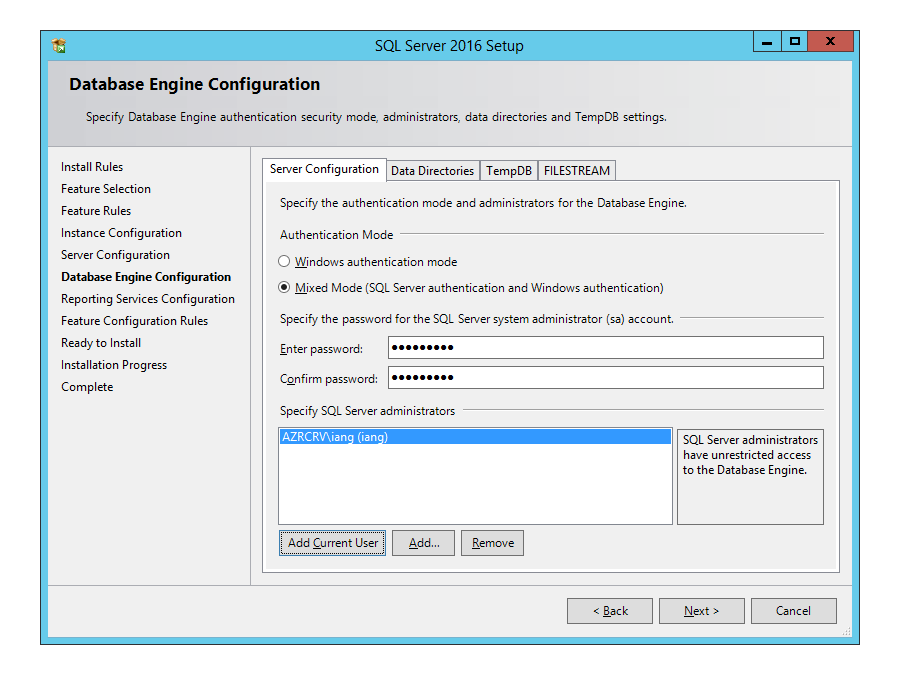
- While installing SQL Server on "Database Engine Configuration" step choose "Mixed mode" and also "Add current user" to SQL Server administrators. Install scripts below rely on SQL Server being configured this way.
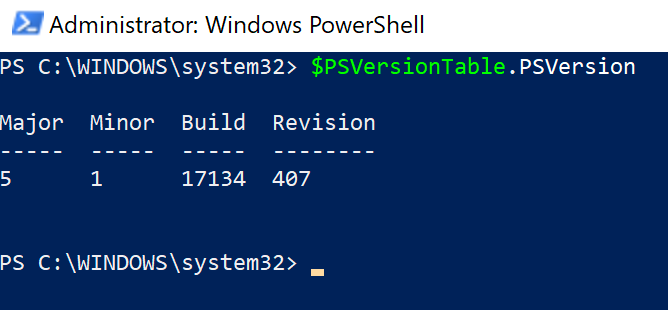
- PowerShell 5.1 or late
- Windows 10 and Windows Server 2016 come with PowerShell pre-installed. To check Powershell version open Windows PowerShell (hit Windows key, type powershell and open "Windows PowerShell as administrator"), enter $PSVersionTable.PSVersion and hit Enter. If you can't find powershell or your version is below 5.1 then install it from
- Web Platform Installer 5.0
- Can be installed from this page
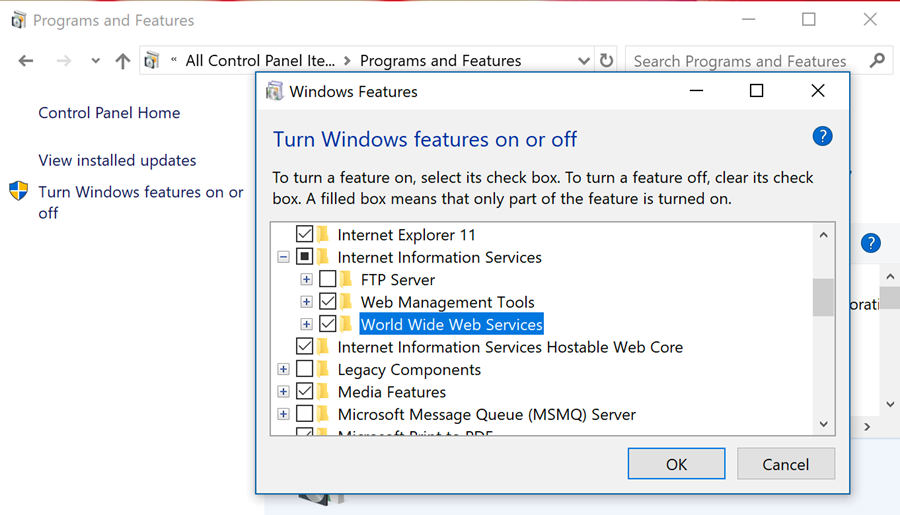
- IIS modules
- Control Panel -> "Programs and Features" -> "Turn Windows featured on or off" and select needed features under "Internet Information Services" (on development machines I'd usually check all except FTP Server) and "Internet Information Services Hostable Web Core". Here's how I usually configure it on DEV environments:
- ASP.NET Core 2.0
- Download and install .NET Core 2.0 (v2.0.8). Here's landing page for .NET Core 2.0 downloadslanding page listing all available versions. For some reason v2.0.9 didn't quite work for me (see troubleshooting section at the bottom of this post), so I'd recommend sticking with v2.0.8 for now.
- Microsoft URL Rewrite Module 2.0 for IIS
- Java for Windows
- Solr 6.6.2
- Here's handy "Install-Solr.ps1" PowerShell script, taken from this blog post by Jeremy Davis - this will download and install Solr for you. Open and edit the script as needed, make sure to update $JREVersion to match your installed Java version. Then open PowerShell as admin, navigate to script folder, run .\Install-Solr.ps1 and let give it few minutes to finish.
- You may get error message complaining about script not being digitally signed, this page has more info on this. If you choose to remove restrictions (and makes your machine less secure) here's powershell command to do it: Set-ExecutionPolicy Unrestricted -Scope LocalMachine
- Once Solr is installed, make sure it works by navigating to https://solr:8983/solr/#/- if you don't see Solr web admin interface, check if your solr-6.6.2 service is running and if not then check if your JAVA_HOME environment variable is properly set to point to path where JRE has been installed
- Node.js
- Downoad Windows installer from Node.js Downloads page and install
Install Sitecore Experience Platform 9.0.2
Download Sitecore packages
- Sitecore Install Packages
- Download "Packages for XP Single" from Sitecore Experience Platform 9.0 Update-2 page. Here's direct download link.
- Unzip downloaded "Sitecore 9.0.2 rev. 180604 (WDP XP0 packages).zip" into "C:\instal\Sitecore folder
- Navigate to extracted "Sitecore 9.0.2 rev. 180604 (WDP XP0 packages)" folder: Copy "Sitecore 9.0.2 rev. 180604 (OnPrem)_single.scwdp.zip" and "Sitecore 9.0.2 rev. 180604 (OnPrem)_xp0xconnect.scwdp.zip" into "C:\Install\Sitecore" folder
- Copy contents of "XP0 Configuration files 9.0.2 rev. 180604" (all *.json files) into "C:\Install\Sitecore" folder
- Sitecore Install Script
- Download Install-Sitecore-902.ps1 into "C:\Install\Sitecore" folder
- Download Uninstall-Sitecore-902.ps1 into "C:\Install\Sitecore" folder
- Update Sitecore Install script
- Open "Install-Sitecore-902.ps1" file in text editor and replace $SqlAdminPassword value with SQL Server's sa password, you've chosen while installing SQL Server 2016
- Copy your Sitecore license file into install folder
- Drop your license.xml into C:\Install\Sitecore. You'll need a license that allows to use Sitecore Commerce 9 or Commerce will not work
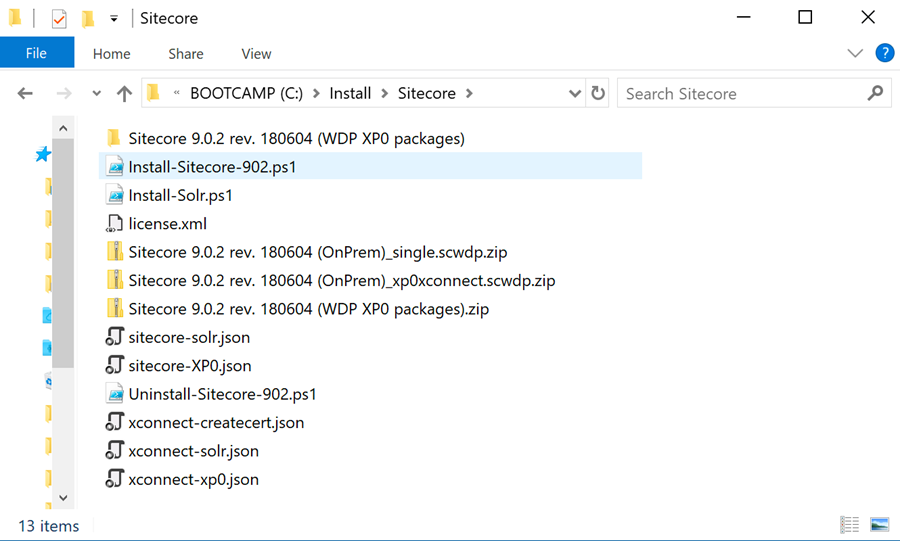
- Verify contents of your C:\Install\Sitecore folder, it should looks like this:
Perform Sitecore Installation Steps
- Install Sitecore Install Framework
- Open PowerShell as administrator, navigate to install fodler by executing "cd C:\Install\Sitecore". Execute below commands, one by one: Register-PSRepository -Name SitecoreGallery -SourceLocation https://sitecore.myget.org/F/sc-powershell/api/v2 -InstallationPolicy Trusted
- Install-Module -Name SitecoreFundamentals -Repository SitecoreGallery -MaximumVersion 1.1.0
- Install-Module -Name SitecoreInstallFramework -Repository SitecoreGallery -MaximumVersion 1.2.1
- Run Sitecore install script
- In powershel console make sure you're still in "C:\Install\Sitecore" folder (cd C:\Install\Sitecore if not) then run .\Install-Sitecore-902.ps1
- Script should take 10-15 minutes to run. Check console output for errors, if there are any, it's most likely due to missing files or dependencies, make sure all above steps were completed
- You can execute .\Uninstall-Sitecore.ps1 to get back to clean state, resolve issues and then run .\Install-Sitecore.ps1 again.
- Get Sitecore instance ready for Commerce install
- Rebuild Core and Master Link Databases: navigate to Sitecore Control Panel then click on "Rebuild link databases" under "DATABASE" section, choose "Core" and "Master" and click on Rebuild, let it finish
- Rebuild Sitecore Indexes: in Sitecore Control Panel click on "Indexing manager" under "INDEXING" section, select all and click on Rebuild, let it finish
Part2. Install Sitecore Commerce 9.0.2
- Download Sitecore Experience Commerce install packages and pre-requisites
- Download "Packages for XP Single" from Sitecore Experience Platform 9.0 Update-2 page then extract its contents into C:\Install\Commerce, this will create multiple zip files under C:\Install\Commerce
- Navigate to C:\Install\Commerce and unzip below zip-files into folders with same names C:\Install\Commerce. Make sure files are extracted directly into appropriate folders (not into duplicate sub-folders with same name e.g. ../SIF.Sitecore.Commerce.1.2.14/SIF.Sitecore.Commerce.1.2.14)
- SIF.Sitecore.Commerce.1.2.14.zip
- Sitecore.Commerce.Engine.SDK.2.2.72.zip
- Sitecore.BizFX.1.2.19
- Download following pre-requisites into C:\Install\Commerce
- Sitecore PowerShell Extensions 4.7.2 (available from the Sitecore Marketplace)
- Sitecore Experience Accelerator 1.7 Update-1 (available from dev.sitecore.net)
- Download msbuild.microsoft.visualstudio.web.targets.14.0.0.3.nupkg, then extract \tools\VSToolsPath\Web\Microsoft.Web.XmlTransform.dll file into C:\install\Commerce. You can simply change *.nupkg extension to *.zip and use regular unarchiver to extract its contents
Perform pre-installation steps
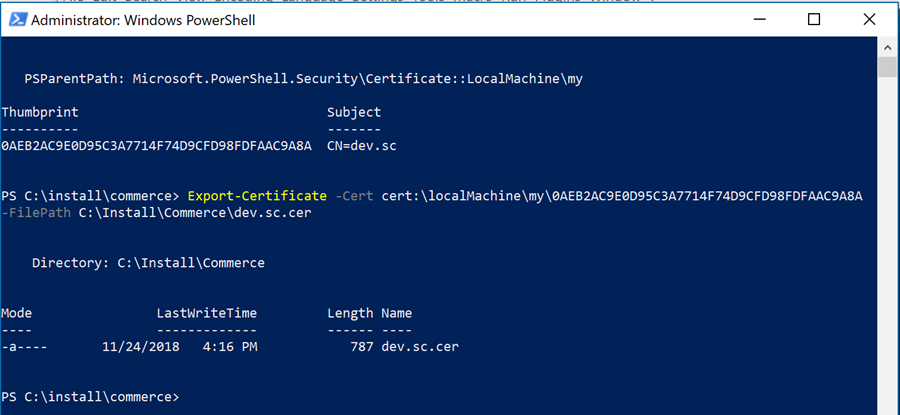
- Create certificate file
- Open PowerShell as admin and execute below commands:
- cd C:\Install\Commerce
- New-SelfSignedCertificate -certstorelocation cert:\localmachine\my -dnsname dev.sc
- Copy certificate thumbprint and paste it into below command to replace "Paste Certificate Thumbprint here" with its value, then execute it in the same PowerShell window
- Export-Certificate -Cert cert:\localMachine\my[[Paste Certificate Thumbprint here]] -FilePath C:\Install\Commerce\dev.sc.cer
- Here's how this it on my machine, your thumbprint will be different of cause
- Update Commerce install script where needed
- OOB installl script can be found at C:\Install\Commerce\SIF.Sitecore.Commerce.1.2.14\Deploy-Sitecore-Commerce.ps1. You can modify it as needed or download this versioninto C:\Install\Commerce\SIF.Sitecore.Commerce.1.2.14 - this should just work as is provided you followed above steps exactly.
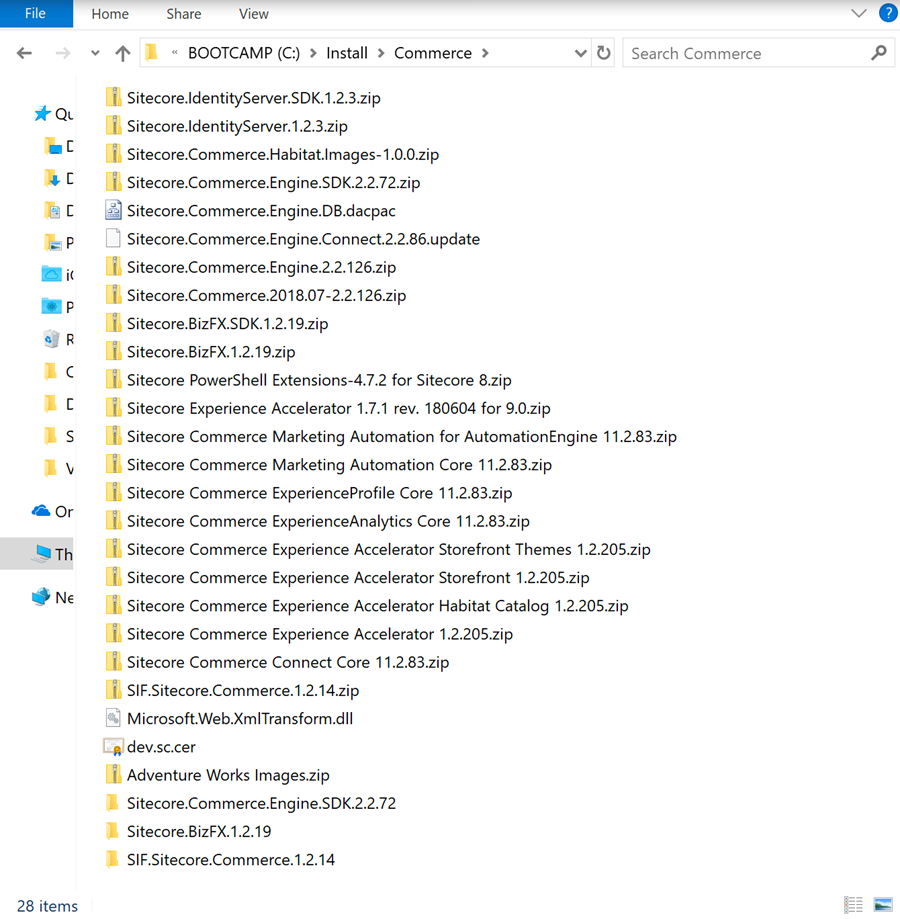
- Verify contents of your C:\Install\Commerce folder, it should looks like this:
Run Sitecore Commerce install script
- Execute below commnds in PowerShell window (running as Admin)
- cd C:\Install\Commerce\SIF.Sitecore.Commerce.1.2.14
- .\Deploy-Sitecore-Commerce-dev.ps1 (or ..\Deploy-Sitecore-Commerce.ps1 to run the original version)
- If all goes well then install will take about 40 minutes. If if fails head to Toubleshooting section below
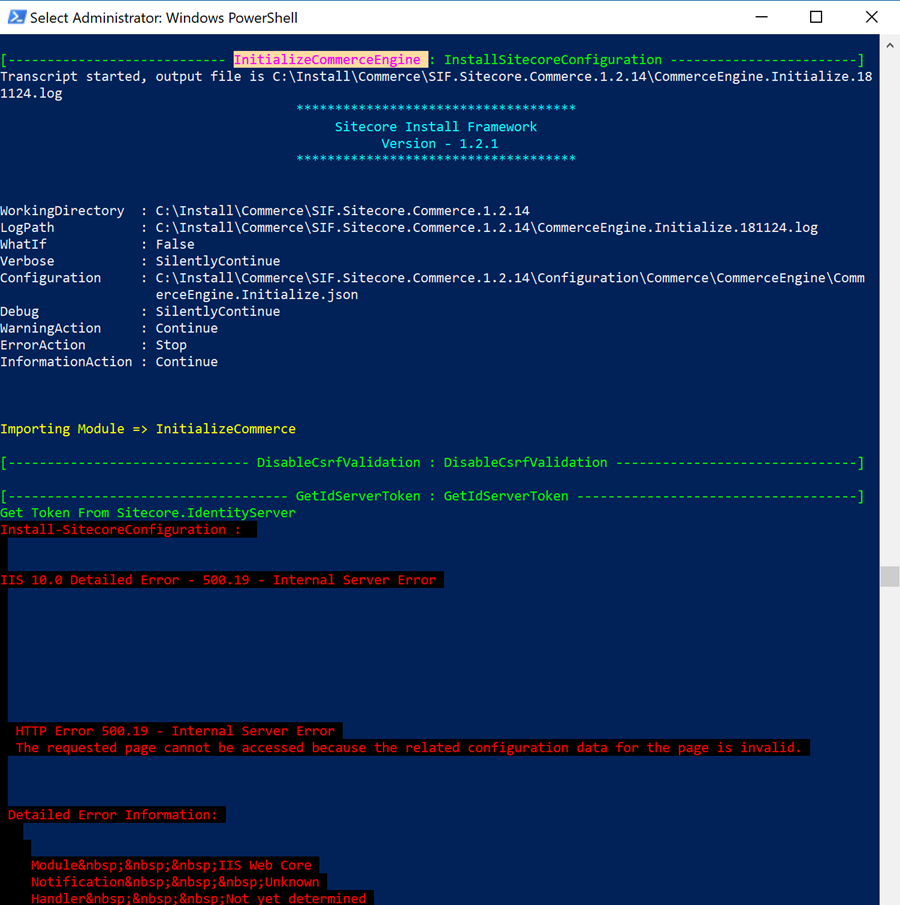
Troubleshooting
- What to do when install Commerce script failed? Commerce install script is driven by this file: C:\Install\Commerce\SIF.Sitecore.Commerce.1.2.14\Configuration\Commerce\Master_SingleServer.json. It contains configuration variables followed by list of tasks, executed one by one during install. If main install script threw an error, then find which module had failed, resolve the issue (try googling for "Sitecore Commerce 9" + Whatcom ever the error message says) remove already successfully installed modiules from Master_SingleServer.json and then then run main install scrip again by executing .\Deploy-Sitecore-Commerce-dev.ps1 command as described above.
- For example, here's snapshot with failed install where problem module is highligted. The root cause in this case was incompatibility with ASP.NET Core Runtime v2.0.9, so I had to uninstall v2.0.9, install v2.0.8 and repeat install starting with failed task.
- InitializeCommerceEngine is the module where error happened
-
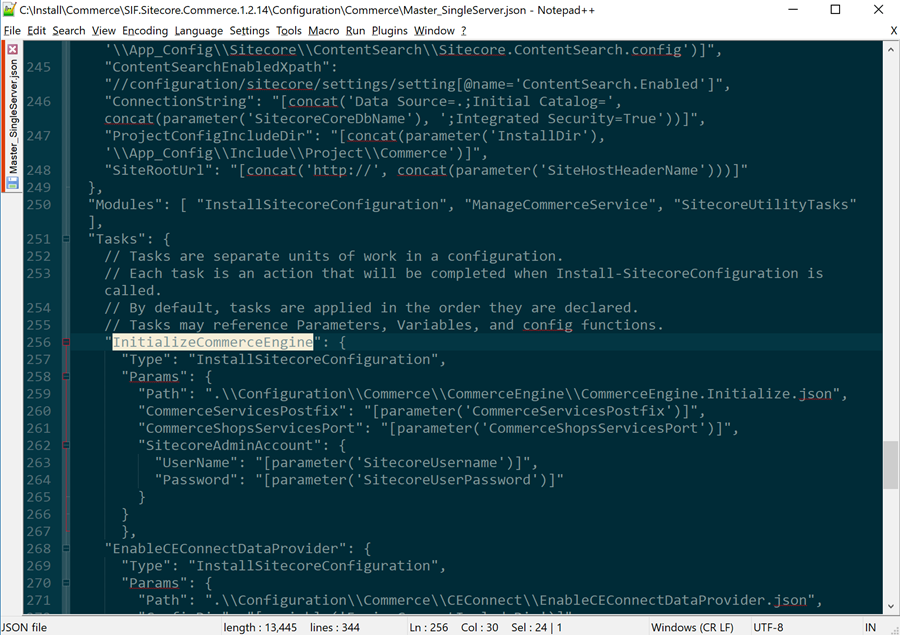
- Resolve the issue (as described above in this case)
- Open C:\Install\Commerce\SIF.Sitecore.Commerce.1.2.14\Configuration\Commerce\Master_SingleServer.json find "Tasks":{ and remove its child nodes that go before InitializeCommerceEngine one, so, in this case InitializeCommerceEngine task would become the first one in the list, like so
- In PowerShell console run the following commands
- iisreset (optional)
- .\Deploy-Sitecore-Commerce-dev.ps1