

Transform Your Customer Support with AI
Modern customer service faces a dual challenge: rising ticket volumes and increasing customer expectations for instant responses. Salesforce Service Agents powered by Einstein AI and Agentforce address both by automating routine inquiries while maintaining context and quality.
In this comprehensive guide, you'll build a production-ready Service Agent that can:
- Handle customer inquiries 24/7
- Create support cases with consistent data
- Intelligently route escalations to human agents
- Maintain conversation context across channels

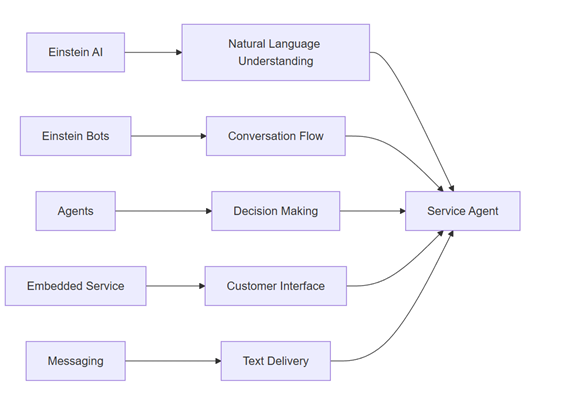
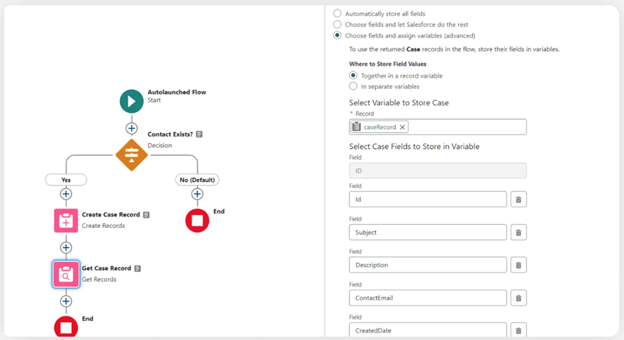
Figure 1: High-level architecture showing how components interact
Prerequisites: Setting Up Your Salesforce Foundation
Before building, ensure your Salesforce org has these five critical components enabled:
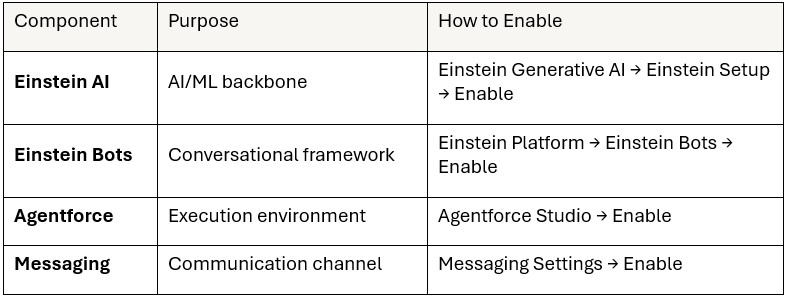
Important Requirements
- Salesforce Edition: Service Cloud with Einstein Bots add-on
- User Permissions: System Administrator or equivalent
- Practice Environment: Use a Trailhead Playground or Sandbox first
Step-by-Step Implementation Guide
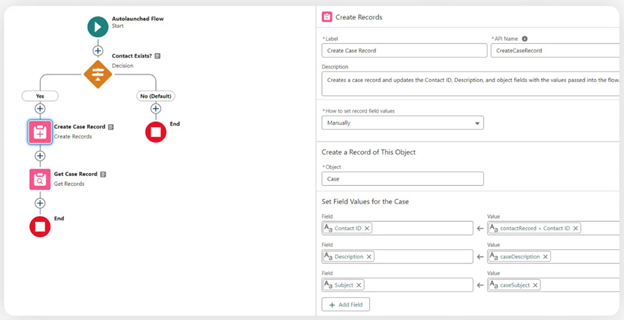
Step 1: Create the Backend Logic (Autolaunched Flow)
Your Service Agent needs structured workflow logic. An Autolaunched Flow serves as this backend engine.
Implementation Path:

Required Variables:

Flow Logic Pattern:
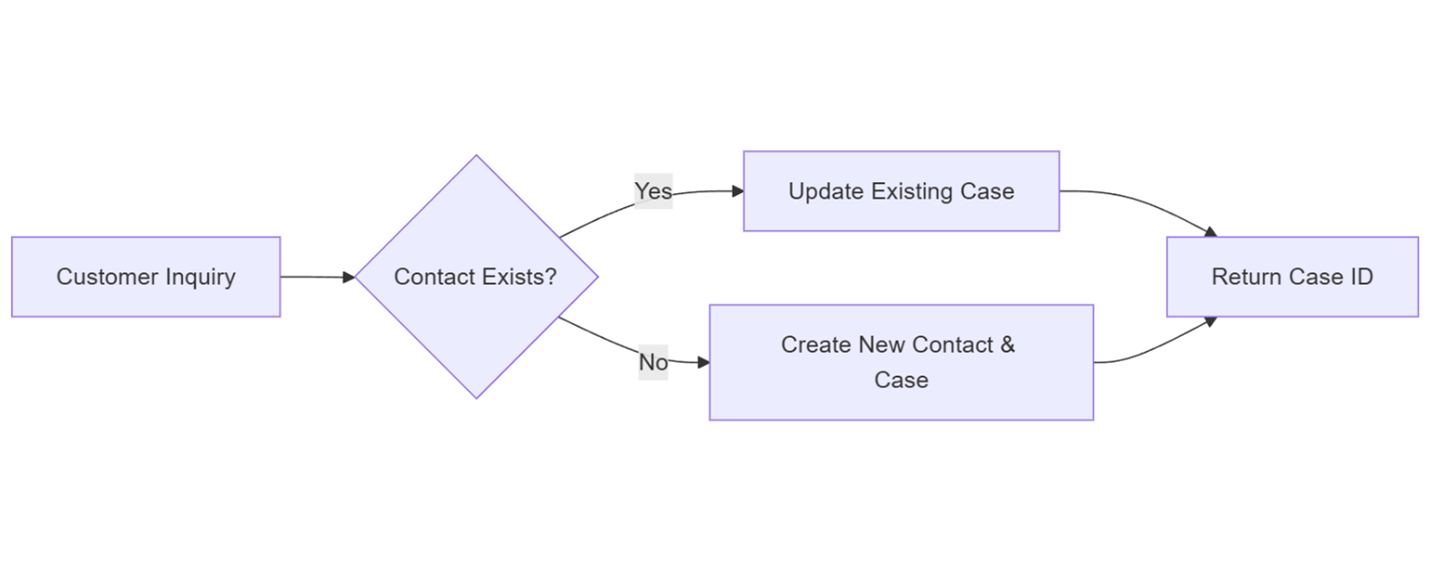
Key Design Principle: Never block case creation. If a customer doesn't exist, create the case anyway and associate contact details later.
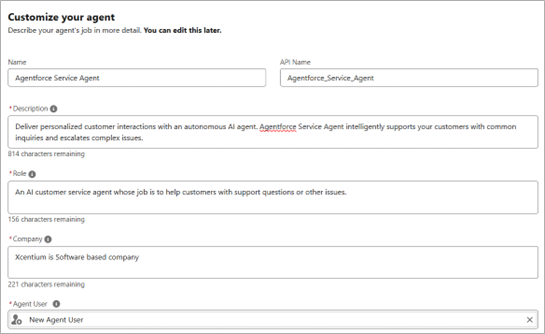
Step 2: Build Your Service Agent
Now create the intelligent interface your customers will interact with.
Implementation Path:

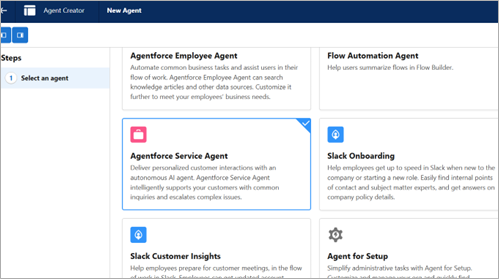
Critical Configuration
- Agent Type: Select “Agentforce Service Agent”
- Topics: Add minimum topics such as Case Creation and Escalation
- System Instructions: Define behavior guidelines
Step 3: Create an Agent Topic
Agent Actions are connectors between your Agent and backend logic.
Implementation Path:

Step 4: Configure Security Permissions
Your Agent cannot function without proper permission.

Step 5: Enable Omni-Channel
Enable Omni-Channel to let service reps manage their work in different service channels from the same app.

Step 6: Create Routing Configurations
Routing configurations determine how work items are routed to service reps and ensure the most important items are handled first.
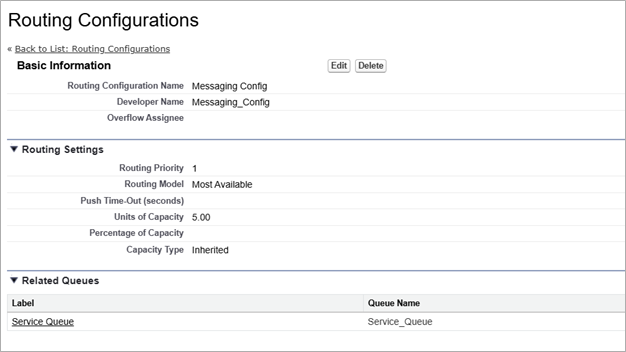
Step 7: Create Messaging Queue for Routing
Queues organize work items for your support team.
- Name: “Service Queue”
- Supported Objects: Messaging Session
- Add appropriate team members
Step 8: Build Omni-Channel Routing Flow
Control how cases flow through your organization with intelligent routing logic.
Step 9: Enable Digital Experience
Enabling digital experiences is the first step to creating an Experience Cloud site or customer portal.
- Go to Digital Experiences settings
- Enable Digital Experiences
- Save configuration
Step 10: Set Up Messaging Channel
Define how customers connect to your Agent.
- Enable Messaging
- Create a New Channel
- Channel Type: Enhanced Chat
- Deployment: In-App and Web
Step 11: Deploy Chat on Your Website
Make the Agent accessible to customers.
- Go to Builder
- Open Components
- Add Embedded Messaging in Site
- Publish
Step 12: Test the Complete Workflow
Validate end-to-end functionality before going live.
Customer: “My order hasn't arrived.”
Agent: “I can help with that. First, may I have your email address?”
Customer: “customer@example.com”
Agent: “Thanks. Could you describe the issue and provide your order number?”
Customer: “Order #12345, expected delivery was yesterday.”
Agent: “I've created case CS-67890. Our team will investigate and contact you within 24 hours.”
Conclusion: Your AI-Powered Support Future
You've now built a complete Service Agent that automates tier-1 support while maintaining Salesforce's robust case management capabilities.
- Reducing Response Times: Instant 24/7 responses
- Improving Data Quality: Consistent case creation
- Increasing Agent Productivity: Freeing human agents
- Scaling Effortlessly: Handling concurrent conversations
- Multilingual Support: Responding in the customer’s preferred language
The most successful Service Agents evolve over time. Start with these foundations and continuously refine flows and topics using real customer interactions and analytics.
Your Service Agent becomes a scalable extension of your support team—delivering smarter customer experiences while improving operational efficiency.