

A Step-by-Step Guide to Integrate Avalara into a B2B eCommerce CloudCraze Solution
CloudCraze (CC) offers a B2B eCommerce implementation for Salesforce. Even though CloudCraze is an unrivaled product within the Salesforce ecosystem, and very complete out of the box, there are always external components that an eCommerce package needs to integrate with. Most often a B2B eCommerce system requires external payment processors or tax calculation services, along with shipping services like UPS and Fedex.
Avalara is a premier sales tax automation service. While its portfolio of products and services covers the spectrum from VAT calculations to sales tax to compliance across all states, it offers integrations with numerous eCommerce platforms and technologies. These integrations boil down to a specific client-side connector on a given platform to the Avalara service. Usually, a platform vendor will produce its own plug-in for Avalara. Occasionally Avalara itself may create a plug in, if needed. For many client-side integrations Avalara offers a marketplace of connectors that are produced by 3rd parties. (Side-note: XCentium has created an Avalara plug-in for Sitecore)
This article describes the steps necessary to connect CloudCraze to the Avalara tax service via a CloudCraze managed package.
Pre-Requisites:
- Accesss to CloudCraze wiki and documentation (i.e. dev account with CloudCraze)
- Create an Avalara developer account - https://developer.avalara.com/ , make note of the account id and company code issued by Avalara. This step also creates a sandbox for your dev account (screenshot below) where the account id and company code will be needed.
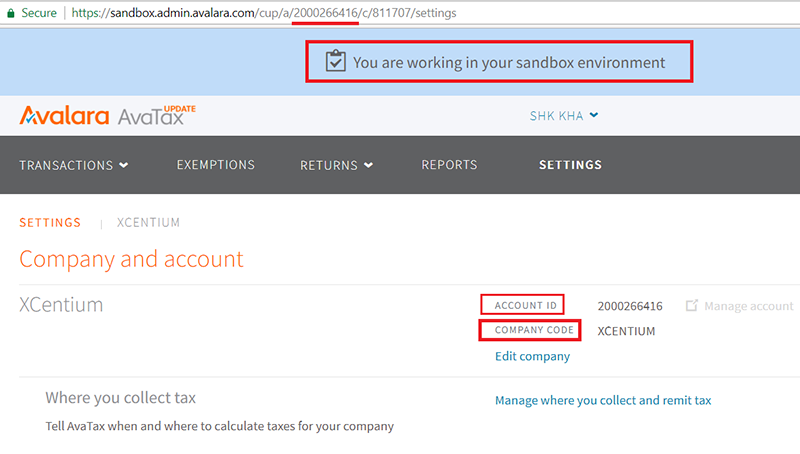
Screenshot Fig 1.0: Shows the Avalara sandbox account s CompanyCode and Account ID, critical information for AvaTax setup
CloudCraze Setup:
Given that you have established a CloudCraze developers account to obtain access to the dev docs as part of the pre-requisites, the CC setup consists of
- Installing the CC managed package for Avalara (AvaTax Svs.)
- Configuring the installation
Installation of Avalara on CloudCraze
Step 1 https://cloudcraze.atlassian.net/wiki/spaces/CD/pages/155147620/Avalara+Avatax+for+CloudCraze+Installation+Guide
Step 2 https://cloudcraze.atlassian.net/wiki/spaces/CD/pages/155147876/Avalara+Avatax+for+CloudCraze+Administration+Guide
Step 3
- Go to CCAdmin
- Select the specific store you are working on in CloudCraze
- Edit the Configuration Setting section of the store
- In the Module drop down select CC Avalara
- Click on 'Override' link of 'Avalara CompanyCode' and add the previously saved CompanyCode
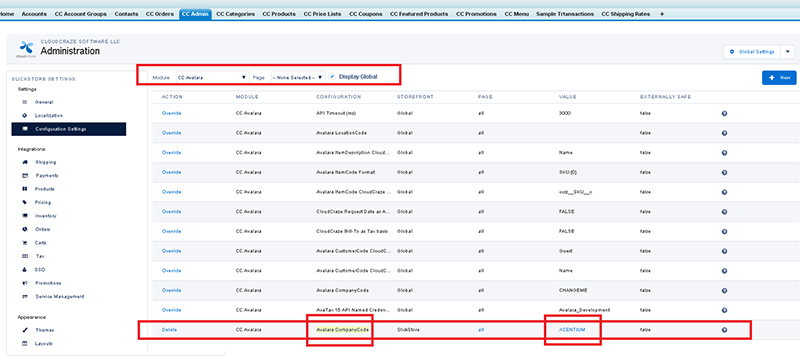
Screenshot Fig 1.1: Shows CC Avalara Module s CompanyCode being set
-Finally rebuild the Configuration Cache of CloudCraze.
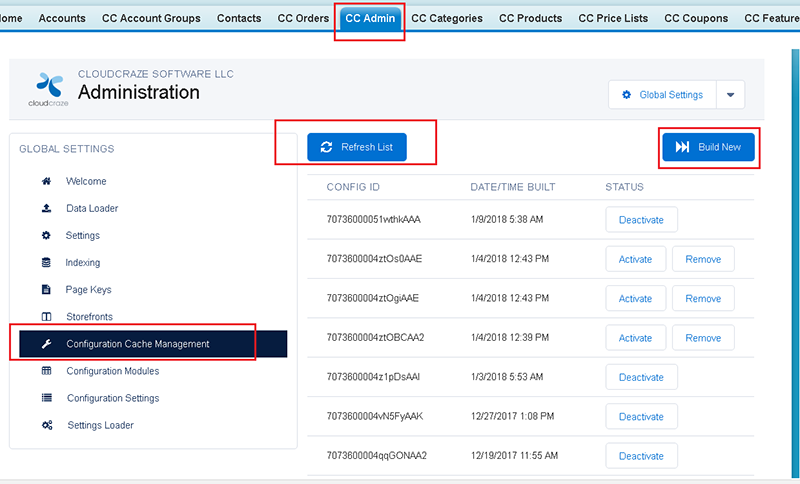
Screenshot Fig 1.2 Shows Rebuilding cache step
The last screenshot below illustrates that CloudCraze calculates and renders the taxes for a given order.
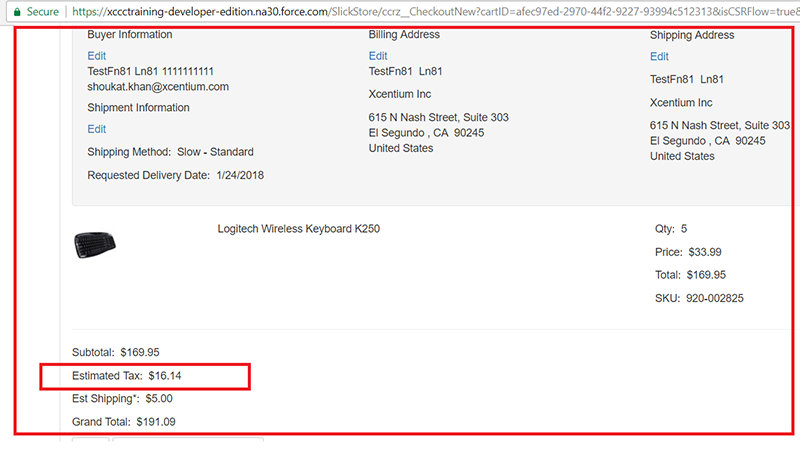
Screenshot Fig 1.3: Shows that AvaTax installed in Cloudcraze SF org calculates Tax
Every commerce implementation has to calculate taxes. By being able to integrate very easily with Avalara AvaTax services, CloudCraze gives developers a slam dunk solution that can be rolled out very quickly.