

CloudCraze (CC) offers a B2B commerce implementation for Salesforce. Even though CC is an unrivaled product within the Salesforce ecosystem, and very complete out of the box, there are always external components that a commerce package needs to integrate with. Most often a B2B system requires external payment processors or tax calculation services, along with shipping services like UPS and FedEx.
One of the key components of any commerce system is its ability to integrate with external web services. This blog post illustrates the basic architectural pattern needed to consume an external web service by walking you through the setup of Authorize.NET.
**
Component/Service Background:**
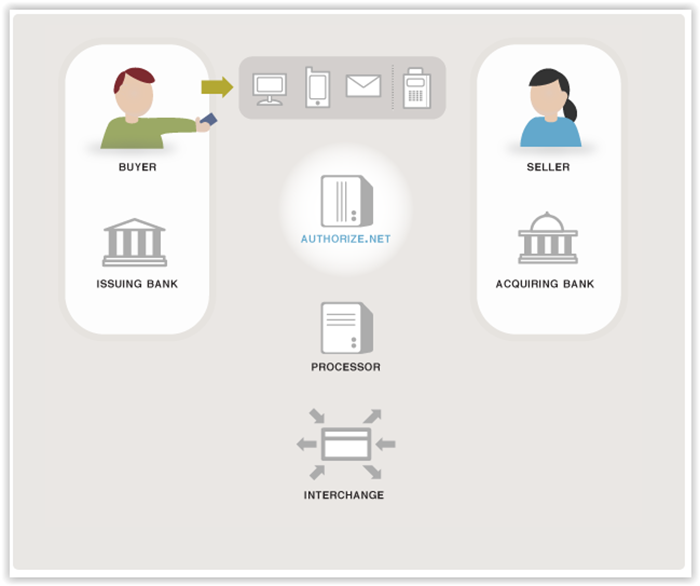
Authorize.NET is a mature third party service that has been providing payment processing infrastructure to e-commerce systems for over 10 year. To illustrate a payment processing service, the graphic below shows the participants in a transaction. End users are rarely aware that submitting a credit card payment causes transactions across banks, credit card interchanges and payment processors. By the same token, the complexities of this process are abstracted away from the developers and merchants who utilize Authorize.NET in their online stores.
Authorize.NET Extension
Extending CloudCraze to accommodate Authorize.NET requires a series of steps that, in a generic sense, apply to many other external webservices. You will need to
- create an area to store config settings,
- -override or extend a class in CloudCraze (most often a controller),
- execute the web service call with appropriate credentials
- use the returned data as needed.
While this document covers a payment provider integration, the same steps can be followed to add other services for example a GeoIP resolution or address verification call. Both are often used in enterprise commerce to prevent inappropriate sales and contribute to clean data.
Pre-Requisites:
- An account with Authorize.NET. to help you set up keys and credentials. You will needto obtain a Transaction Key and Login ID for your system
- You will also need to obtain the web service end point url
Implementation:
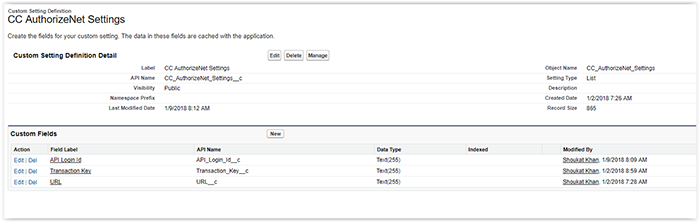
- Create a Salesforce Customer Settings Definition to contain the Authorize.NET specific values for
- API Login
- Transaction Key
- URL
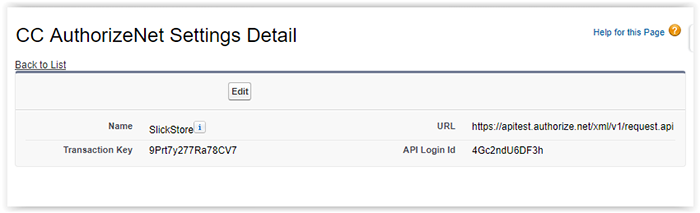
- Enter the setting values you obtained as part of the pre-requisites.
The CloudCraze Managed Package contains an application that natively runs within Salesforce. It encompasses a rich service based architecture with several extension points. While not the subject of this blogpost, the following diagram helps to illustrate this structure and helps to show the location of your code changes within the greater system.

In order to use Authorize.NET we will need to alter the CC_PaymentController. CloudCraze has a fantastic configuration system that allows developers to swap out a call to a particular class in declarative fashion. The following section illustrates how simple this process is.
Start by making a copy of CC_PaymentController.aspxc - in our case we called the copy cc _xc_CCPaymentController.
Open the copy and modify its contents. You will need to make a remoteaction call to Authorize.NET and handle the JSON response coming back from that service, taking care to store authorized transactions in CloudCraze, or if things go side-ways handle any error responses.
The following code snippet illustrates key points within this class
@RemoteAction
global static ccrz.cc_RemoteActionResult doChargeCreditCard(
final ccrz.cc_RemoteActionContext ctx,
String actNum,
String expYear,
String expMonth,
String pmntType,
String acntType,
String formCVV)
{
//this will hold all data we want to return
Map dataMap = new Map();
dataMap.put('MSG', 'Default MSG');
dataMap.put('theString', 'Default String');
dataMap.put('CART', 'NULL');
dataMap.put('STATUS', 'Failure');
dataMap.put('DebugString', 'NULL');
dataMap.put('transactionID', 'NULL');
//instantiate result
ccrz.cc_RemoteActionResult res = ccrz.cc_CallContext.init(ctx);
res.success = false;
res.data = dataMap;
//instantiate settings
CC_AuthorizeNet_Settings__c settings = CC_AuthorizeNet_Settings__c.getInstance(ccrz.cc_CallContext.storefront);
if (settings == null) {
dataMap.put('STATUS', 'EXCEPTION');
dataMap.put('theString',
'Missing Custom Settings. Please contact customer service.' );
res.success = false;
return res;
}
try
{
code omitted for brevity
Map queryParams = ctx.queryParams;
String cartGUID = queryParams.get('cartID');
ID contactID;
//get the cart from the cartID from the remoteaction context
ccrz__E_Cart__c cart = [Select
ccrz__Storefront__c,
ccrz__User__c,
ccrz__Contact__c,
ccrz__Account__c,
OwnerId,
Name,
Id,
ccrz__TotalAmount__c,
ccrz__EncryptedId__c
From ccrz__E_Cart__c c
Where
ccrz__EncryptedId__c = :cartGUID
limit 1];
dataMap.put('CART', cart**.**ID);
//build a request to Authorize.NET
HttpRequest req = new HttpRequest();
req.setMethod('POST');
req.setEndpoint(settings**.**URL__c);
req.setHeader('content-type', 'application/json');
String refId = String.valueOf(DateTime.now().getTime());
Decimal amount = cart.ccrz__TotalAmount__c;
string msgBody ='{"createTransactionRequest":{"merchantAuthentication":{"name":"'+settings**.API_Login_Id__c+'","transactionKey":"'+settings.**Transaction_Key__c+'"},'
+'"refId":"' + refId + '","transactionRequest":{"transactionType":"authCaptureTransaction","amount":"'+ amount +'","payment":{"creditCard":'
+'{"cardNumber":"'+cardnumber+'","expirationDate":"'+ cardyear + '-' + cardmonth +'","cardCode":"'+CVV+'"}},'+''+'}}}';
req.setHeader('Content-length', String.valueOf(msgBody.length()));
req.setBody(msgBody);
req.setTimeout(60*1000);
Http h1 = new Http();
String resp1;
HttpResponse res1 = h1.send(req);
resp1 = res1.getBody();
Map responseMap =(Map)JSON.deserializeUntyped(res1.getBody().substring(1,res1.getBody().length())) ;
//handle error responses store successful auth info ?
Code omitted for brevity
At this point one last step remains configuring CloudCraze to execute your class in place of its own. That step, as well as all other config setting changes are done via the CC Admin panel.
I ve reviewed the principle steps needed to build a custom payment authorization integration with CloudCraze. The same steps can be applied to working with other web services for example an address verification system.