

Creating Sitecore Commerce Engine Solution with Visual Studio. Part 2
Overview
This post is the second part of a two-path walkthrough on creating configuring Visual Studio solutions for your Sitecore Commerce 9 implementation. Part 1 : Creating Sitecore Commerce Engine Solution with Visual Studio, explains the structure of and provides guidance on creating Commerce Engine solution, which is usually deployed on all four instances that run Sitecore Commerce Engine (Authoring, Shops, Minions and Ops). This part covers the website solution, which will run on your Sitecore CM and CD instances. It is possible to merge Commerce Engine and Sitecore website code into one solution, but more practical to keep them separate as they are meant for connected, but different environments, rely on different frameworks and often even built by different people.
Prerequisites
- You'll need Sitecore and Commerce installed on your target environment. This guide assumes you'll be working on your local workstation or a VM. Using Azure environment will require some tweaks, but most concepts, described here will still apply. You'll need a proper license.xml file in order to install Sitecore and Commerce on your environment(s) of cause.
- This guide is short and dry, but has many links pointing to other documents and blogs to provide an additional information where needed. Referenced Sitecore documentation and install packages are only accessible to certified Sitecore developers.
Sitecore Helix
The solution architecture described in this guide is based on Sitecore Helix, so understanding it and being comfortable with Helix concepts is required. If you didn't get a chance to learn Helix before then Sitecore's helix.sitecore.net website can be a great place to start and there's a good number of other guides and documents on Helix available online. All projects within website Visual Studio solution will fall into one of the three categories: Foundation, Feature and Project, which in Helix are called layers. helix.sitecore.net does a good job explaining those layers, so in this post I'll just cover some of the main aspects related to implementation of Sitecore Commerce Storefront with Helix solution structure.
Unicorn
Unicorn is a utility for Sitecore that solves the issue of moving templates, renderings, and other database items between Sitecore instances. Same as with Helix, Unicorn itself is out of scope of this post, but we'll use Unicorn in our solution. if you're new to Unicorn then you can start at Unicorn on Github, Google for more details where needed. This post explains how to leverage Unicorn in your Visual Solution and doesn't cover Unicorn basics.
Creating Your Helix Solution
Below steps assume you already installed "vanilla" Sitecore 9.2 installed on your workstation, if not then you'll need to download packages for XP Single and follow Sitecore's Installation Guide to install it on your local workstation. You need to be certified and registered with Sitecore in order to use last two links.
So where do we start creating our custom Sitecore solution, based on Helix principles? Sitecore provides sample Habitat solution, which is meant to be used for illustration and demo purposes, but not intended to be used as starting point, some people do, but it's a mistake because Habitat has quite a few things you won't need - you'll be better off using one of the Helix starter kits. In this post we'll use Helixbase, depending on your requirements you may choose to Google for alternatives, but concepts described here might still apply for the most part.
To create your solution from Helixbase
- Clone or download Helixbase from github into your solution source folder, unzip if needed.
- Decide on your solution name and run .\tools\rename.ps1 -ProjectName NewWorldCorp [NewProjectName]' powershell script from your source folder
- Follow the "Setup Instructions" from its readme.md. Don't forget to update sourceFolder variable value in Project/Common/code/App_Config/Include/Project/z.Common.DevSettings.config to match your local project path
- Configure Helix publishing pipeline on your local instance
That's pretty much it! Rest of this post will cover some of the main aspects of Commerce website solution and configuration settings you might need to change
Publish Solution with Helix Publishing Pipeline
The Helixbase project is using the Helix Publishing Pipeline (HPP) to allow publishing to file system, Azure, Docker, etc. and seems like much better alternative to gulp-based deployments for Helix-based Sitecore solutions. The local solution you created in step will come pre-configured to use HPP and should cover your deployment needs or at least will get your started and then you can refer to HPPs project readme to learn how to customize it for your specific needs.
To publish solution on your local workstation simply open solution in Visual Studio, right click on Website/[Your Project Name].Website, choose "Publish" in context menu, (validate your publish settings) and then hit "Publish" button. Your "website" project will be deployed along with all dependencies, which are all the projects, NuGet packages and DLLs referenced in "Website" solution. When you add new projects to your solution, make sure to reference those from Website/[Your Project Name].Website or, indirectly, from other projects that "Website" project already referencing otherwise they won't be deployed to your site. One word of caution: when referencing DLLs or NuGet packages, make sure they won't conflict with their versions that already exist in your website root - pick the same version as what's already in your site's bin folder.
Once you published the solution for the first time, you'll need to perform initial Unicorn sync. To sync Unicorn navigate to unicorn control panel (usually at [Your Site Root]/unicorn.aspx) and sync all projects from there. If you're seeing errors in Unicorn Control panel then you can check couple of usual suspects:
- Check if sourceFolder variable in App_Config\Include\Project\z.Common.DevSettings.config is correctly configured to point to your local project's folder
- Run the full sync by hitting [your site root]/unicorn.aspx?verb=Sync&log=Debug&skipTransparentConfigs=false url.
Once you performed initial Unicorn sync, your /unicorn.aspx page should look similar to below screenshot. Don't forget to publish site and rebuild indexes after successful Unicorn sync, Unicorn is trying to publish synced files automatically, but this last step didn't work reliably enough for us, so I usually perform manual after Unicorn sync.

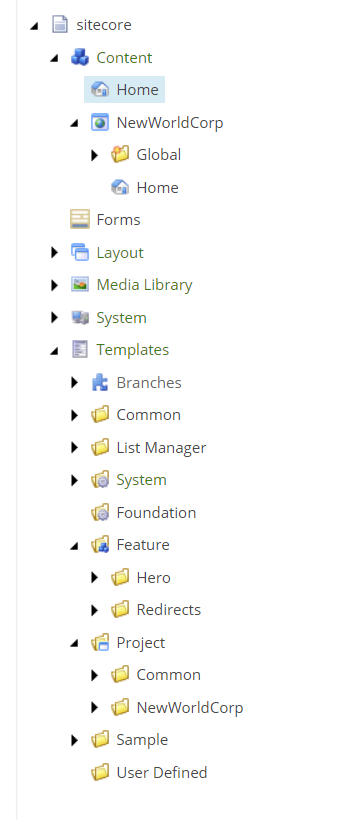
Once Unicorn sync completed successfully, your Sitecore content tree should look similar to below screenshot, where instead of "NewWorldCorp" you should see the name, which you gave to your solution when created solution following the steps above. Your Templates, Layouts, Models, Placeholder Settings, Settings, etc. should now have "Foundation", "Feature" and "Project" child folders, some with content items inside them and some empty. Those folders are created during Unicorn sync from Unicorn files your solution folder. This folder structure follows Helix conventions and you'll need to keep it this way - for each project its content items, need to go into appropriate folder/path in Sitecore content tree. Folder path will depend on project's layer ("Foundation", "Feature" or "Project"). When adding new projects to solution you can use existing [project name].Serialization.config files from existing project(s) in same layer as an example on how to configure Unicorn sync and ensure content items related to your project are serialized into its "serialization" folder.
Clean Up Helixbase Starter Solution
Helixbase comes with a few sample projects under different layers which you can use as an example and then delete when they are no loner needed, but this mostly applies to "Feature" projects. You may decide to keep and use most of "Foundation" projects code. Projects under "Project" and "Website" solution folder don't have much code and "serialization" folders under each will be cleaned up by Unicorn sync as you clean up your Content Tree from items you don't need.
Reference Sitecore and Commerce NuGet Feeds
NuGet packages is the best and recommended approach for referencing 3rd party dependencies in Visual Studio solution's projects. (as opposed to referencing other Sitecore DLLs directly). If you haven't already, you'll need to configure NuGet package sources in your Visual Studio to include Sitecore and Commerce feeds.
- Sitecore platform NuGet feed is at https://sitecore.myget.org/F/sc-packages/api/v3/index.json
- Sitecore rel="noopener noreferrer" Commerce feed is at https://sitecore.myget.org/F/sc-commerce-packages/api/v3/index.json.
Once above feeds are configured, you can add/update the packages you need as described here (simply right-click on your project, choose "Manage NuGet Packages" and search for "Sitecore.Commerce.[whatever you need]" in "Browse" section.
Overview of Storefront Content In Sitecore Content Tree
Commerce storefront will use item records from Sitecore Commerce and Sitecore content databases.
- Commerce items, such as catalogs, carts, orders, pricing records, promotions, etc. will come from Commerce "Shared" database and you might need an approach for serializing and distributing Commerce items across your environments. Commerce data can be serialized and deserialized using Commerce Engine APIs and it usually belongs in Commerce solution.
- Sitecore content items, related to your storefront will be stored in Sitecore master and web databases, just like any other Sitecore content item, so those items can be serialized and deserialized using Unicorn. Below sections describe major types of content items in Sitecore content tree, related Commerce.
Commerce Control Panel
Various Commerce-related configuration settings can be found under /sitecore/Commerce/Commerce Control Panel - if you tweak those settings for your project needs then you might need to include their paths into your Unicorn sync configuration.
Catalog Generated Templates
Your Commerce solution might leverage custom components or Entity Composer templates, in which case you'll need to include them into your Commerce templates by clicking on "Update Data Templates" button in Commerce menu in Content Editor.

Quick note on Composer Entity Templates: those are well covered in Rob Erlam's posts on "Sitecore Entity Composer, End-to-End", part 1 and part 2. Just a couple of things I'd like to mention here:
- "Template inheritance" issue mentioned in part 2 has been resolved in Sitecore 9.1
- You may need to manually add your generated "Entity Composer" templates to your base entity templates by selecting ConnectSellableItem, ConnectCategory or ConnectCatalog (under /sitecore/templates/Commerce/Catalog Generated/) and manually choosing your generated Composer templates in "Base Template" multi-select field. Composer templates are getting added under /sitecore/templates/Commerce/Catalog Generated/Components when you select Commerce menu and choose "Update Data Templates" in Sitecore Content Editor
All auto generated templates will reside under /sitecore/templates/Commerce/Catalog Generated/Components. Catalog, Category and SellableItem templates can be found under /sitecore/templates/Commerce/Catalog Generated, those may need to be serialized and included into Solution as well.
Commerce Templates and Renderings
OOTB Commerce Templates and Renderings are getting created in Sitecore during Commerce installation and they usually don't need to be serialized and included into Solution. If you need to add custom fields in those templates you'll be better adding them into your custom templates, which would inherit from OOTB ones rather than adding your custom fields into OOTB templates directly. This way your custom templates will be serialized and included with your solution and OOTB ones will not, which will help to avoid conflicts when time comes for upgrade to future versions of Sitecore and Commerce.
Site Content and Media Items
Your Content Tree will have one or more websites, an SXA or regular ones (or a mix of both) and the strategy for serializing Commerce content in this case will be the same as with regular content items: avoid overwriting content items managed by your content editors on higher environments - be careful not to overwrite your Production or UAT site content with changes coming from your local and integration environments.
Serializing Storefront-Related Items with Unicorn
Helixbase starter kit comes with foundational serialization settings included, Unicorn configuration folder is getting created when Unicorn NuGet is added to project. Helixbase comes with Serialization project, which already has Unicorn NuGet reference added to it, so Unicorn is already included in your custom solution, based on helixbase. There's usually no need to reference Unicorn in any other projects in your solution. Serialization project lives under Foundation and it adds foundational configuration settings related to Unicorn sync. As per Helix guidelines each "Feature", "Foundation" and "Project" project in your solution will have its own Unicorn serialization configuration and "serialization" folder for Unicorn files when it need to bring its Sitecore dependencies into solution. Unicorn configuration files go into [project root]/App_Config/Include/*/[project name].serialization.config file - check existing projects in your Helixbase-based solution to see some good examples.
"Foundation" and "Feature" serialization settings should only include their own Sitecore items, so when creating your own Foundation or Feature projects, you can in most cases just copy serialization settings from similar existing projects, change file name as well as name and description on configuration XML in order to enable Unicorn sync for your project.
The "Project" projects (the ones under the Project folder in your solution) will serialize your Content and Media items, so you might need to tweak those settings to include what should be synced across your environments and exclude everything that shouldn't. When you need to sync Unicorn files across different environments (e.g. Local, Integration, QA, Production) then Sitecore rule-based configuration is the way to go - similarly to all other configuration settings you can define your serialization settings differently depending on application roles or environments.
References
- Sitecore Helix Documentation
- Unicorn on Github
- Sitecore XP Install packages and Installation Guide
- Helixbase Started Kit project on github
- Helix Publishing Pipeline
- Configuring NuGet package sources your Visual Studio
- Referencing NuGet packages in Visual Studio projects rel="noopener noreferrer"
- Sitecore XP Platform NuGet feed https://sitecore.myget.org/F/sc-packages/api/v3/index.json rel="noopener noreferrer"
- Sitecore Commerce NuGet feed: https://sitecore.myget.org/F/sc-commerce-packages/api/v3/index.json
- Rob Erlam's posts on "Sitecore Entity Composer, End-to-End", part 1 and part 2
- Sitecore rule-based configuration