

Recently, I led the architecture of a large-scale headless implementation leveraging Sitecore XM Cloud, Sitecore Search, Sitecore CDP, Sitecore Personalize, and Sitecore Forms. Along the way, I gained valuable insights that I'd like to share. In this blog, I’ll highlight the critical discussions that every leadership team should have during the initial phase of headless digital implementation. The decisions made at this stage will have a lasting impact on the overall digital capabilities of the system.
Live and Preview Sites for each environment
Decisions to be made – Do you want a preview site?
If yes, do you want it to be open for all, password protected, or be only available to trusted IPs
Another decision point, with the availability of a highly performant page builder and role-based editing feature, do you see the need of a preview site?
If you need a preview site and with password protection, you will most likely encounter broken images once you set up the protection. To overcome this issue, always use relative image URL in the Next.js image tag.
But, if you protect the sites and use the relative image URLs, you will see that images stop working in the Page Builder. So, to truly take advantage of Vercel’s image optimization features, you will need relative URLs in the next image tag outside of page builder. In your application, based on an environment variable, you should strip out the domain from the full image URL. This will allow the images to be rendered properly on the page builder and image optimization features to be available on the preview site.
If you don’t care about the image optimization features by Vercel in the preview environment, then you can disable image optimization for protected environments by updating next.config.js to disable the image optimization based on an environment variable. You can set the value to true based on environment variable. It is worth noting that Vercel’s image optimization is a separate service even when the image is hosted on the same domain.
Since Next.js 12.3.0, this prop can be assigned to all images by updating next.config.js with the following configuration: 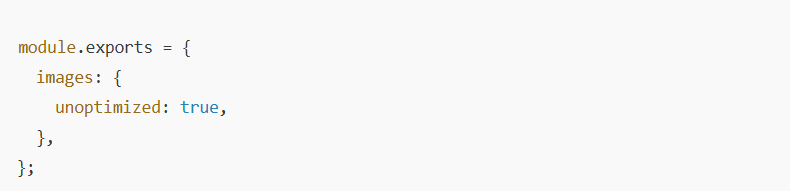
More on this topic here: Components: Image | Next.js
Considerations when configuring the Preview Site:
Use Preview Deployments
Vercel preview deployments site does not get crawled by search engines (Environments)
These are helpful when you want a preview of the latest code with the production content. It does not work when you need a dedicated environment where the content is rendered from a different service (preview context, preview search).
Use Custom Site
You can use shared environment variables and site-specific environment variables for Edge vs Preview context and graphql APIs, Search sources. This provides the type of control we want over preview environments. You can add shared environment variables for common properties and separate preview site specific environment variables like ContextId, gQL endpoints, tokens, etc. This becomes a dedicated environment with a custom domain. You will need to add logic to either protect it via trusted IPs or password so that the bots do not crawl this preview site.
Complexity arises when different sources for Live and Preview in Search are used. You need to push to preview or live sources based on item save or publish. We will talk about this more in the Indexing Considerations section.
We went ahead with the custom site implementation for the preview site. The setup took only 1 day.
Indexing Considerations
You have so many options to put data into the index for search engine. There are consequences of selecting one. Data recency is the biggest factor. The question you need to ask is “How quickly should the data that is published or has changed should be reflected on the search widgets or on the website features that use search?”
Crawling runs on a schedule. Push Source along with Ingestion API gives you the capability to update the search index quickly.
Another thing to keep in mind is what data do you need in search? Do you need external systems to push data to Search instead of calling their APIs during page loads? Can we reduce network calls during build time or dynamic API calls? You can push data from multiple sources into search, not just Sitecore CMS. If you are moving from XP to XMC, you will need to rearchitect some components that fetch data from external systems so that it becomes a widget in Search. If the recency of data can be negotiated (unlike real time price, inventory), then the data needs to be pushed to search. Additionally, you get the benefit of creating dynamic widgets, based on external properties.
It is evident that Sitecore Search was going to play a critical role in the website’s experience. There were a lot of widgets that were configured as components in Sitecore XP, data sourced. These were moved to Sitecore search as widgets. Data from external sources, for which we call the APIs in XP, was pushed to Search. It allowed the website to offer better search experience and marketers were trained to use Sitecore search features like Relevancy, Widget Variants, Sorting, and recommendations. All these features can be altered by the marketer (without a developer).
Live vs Preview Search Behavior
If you need a preview site, you will need to configure a duplicate source but with a prefix or suffix. After this, you will need to configure the preview site to read from the preview source. Also, configure a preview crawler that crawls the website with a preview url. If you are using the push APIs, you will need to push to Preview source on item save using the webhook as well. For live source, you will need to push using edge webhook on item publish.
Scalable Integration Layer
At a high level, you will need to process large amounts of data (incoming and outgoing). How to manage so many backend integrations? Based on the organization, the choice be Azure, AWS or on Prem. You will need infrastructure to host Serverless Functions, Queues, Topics, Service Bus, VPN, API Manager, etc.
Here are some tasks that need to be done asynchronously:
Forms Submission
Every time a form is submitted on the website, it needs to be stored somewhere. We selected the form response to be stored in a Queue. Why? Because it needed to be processed for its destination. Also, pushing to the queue after basic validation makes it a better user experience as the user sees a thank you message right away.
Forms Processing
Once the form response was pushed to the queue, an Azure function evaluated the response and based on business logic it determined the destination – could be Salesforce or HubSpot etc. It then translates the response into the desired object and pushes it for ingestion. Another advantage of this architecture is that when multiple forms are submitted, the asynchronous nature of the form submission makes it scalable.
Indexing and Computed Index Fields
For XP folks, all the computed index fields we had for Solr, we moved it to Azure function. This made sense because the CMS publish webhook can push to a queue or call the function directly. We needed authentication for the Edge webhook, but it was not available, so we used a queue and then the Azure function picked up the items in the queue after establishing oAuth identification.
If you have a preview website, you will need to perform the same action on the item webhook but item webhook support oAuth so it was easy to just push to Azure function.
Data Synchronization
A lot of items need to be in the content tree. These items are created in internal systems and the metadata needs to be pushed to CMS so that it can be enriched by Digital Marketing. For this process, we used Admin APIs to create, update and delete. Again, for this to work reliably, you will need the whole synchronization process to be asynchronous and use a queue to trigger the synchronization process. Once the item to be synched is in the queue, it is picked up by an Azure function to push it to CMS. Upon item creation in the CMS, based on the workflow set up, it is pushed to the preview source using a webhook. The CM needs to sync many types of data from the backend system. Again, the integration layer was used to push data to the XM Cloud CM using Admin GraphQL. Once the data was pushed, the webhooks pushed the items in the indexing queue for the Search to be updated for preview source.
Connectivity to On Prem via VPN
You will need to consider options so that you securely pull data from on prem systems while also pushing them to it.
Personalization
What kind of personalization do you need? Page Level vs Component?
There are options available for both approaches. Additionally, are you comfortable with displaying personalized content asynchronously after the page has loaded? If not, you may need to consider implementing it at the backend. Sitecore XMC allows you to configure variants at the page level, while Sitecore Personalize provides more granular control at the component level. By using Cloud SDK, you can push data to CDP and leverage it in Personalize widgets, with front-end scripts responsible for rendering those widgets. In some cases, we required components to load with personalized data on page load, so for those, we implemented the logic on the backend, as it was a critical customer requirement. However, we still pushed the data to CDP through Cloud SDK. We also created a Personalize widget for features like 'Pick up where you left off,' which uses data ingested into Personalize from CDP and is rendered asynchronously after the page load.
Quick note on using CloudSDK for CDP – We were using the engage SDK in XP. We were passing Point of Sale, Client Key etc. in the engage SDK for pushing events. In the cloud SDK, the contextID maps to the client key and the sitename matches the Point of Sale. Client Key will automatically map while you can override site name for whichever POS you need. The cloud SDK still supports the same features as engage. Integrating the cloud SDK was simple and efficient.
It is ideal to use cloud SDK for Search, CDP and Personalize. An important thing to check before starting development is to check the compatibility of the various packages here https://doc.sitecore.com/xmc/en/developers/sdk/004/cloud-sdk/prerequisites.html#compatibility-with-jss and https://doc.sitecore.com/xmc/en/developers/sdk/004/cloud-sdk/install-and-initialize-the-cloud-sdk.html
Implementing headless architecture with Sitecore XM Cloud or with any similar platform requires careful planning and decision-making, especially in the early stages. The choices you make regarding personalization, data handling, and the balance between front-end and back-end execution will play a significant role in the long-term success of your digital platform. By considering these key decision points early on, you can ensure smoother implementation and a more robust, scalable system that meets both your current needs and future growth. I hope these insights help guide your own headless journey, and I look forward to hearing about your experiences and challenges as you embark on your digital transformation. If you want to learn more about Sitecore XM Cloud implementations, please do not hesitate to reach out to me either on LinkedIn or Contact Us form on the website.