Creating Sitecore Commerce Engine Solution with Visual Studio
August 03rd, 2019
Overview
This post is the 1st part of a two-path walkthrough on creating configuring Visual Studio solutions for your Sitecore Commerce 9 implementation. This part explains the structure of and provides guidance on creating Commerce Engine solution, which is usually deployed on all four instances that run Sitecore Commerce Engine (Authoring, Shops, Minions and Ops). Part two, Creating Sitecore Commerce Storefront Solution in Visual Studio will cover the website solution, which will run on your Sitecore CM and CD instances.
It is possible to merge Commerce Engine and Sitecore website code into one solution, but more practical to keep them separate as they are meant for connected, but different environments, rely on different frameworks and often even built by different people.
Getting Started on Commerce Engine and Commerce Plugins
The Commerce Engine is an ASP.NET Core application, which exposes its APIs via a set of RESTful APIs. Commerce Engine hosts a collection of Commerce Plugins, where each plugin implements a specific functionality and usually exposes it via RESTful API. If you're new to Sitecore Commerce then I'd recommend investing enough time to understand core concepts, laid out in below documents:
- Commerce Engine Overview is a very high-level overview of Commerce Engine
- Elements of a Commerce Engine plugin describes major core classes which Commerce Plugin can consist of or interact with
- Work with Commerce Engine pipelines and blocks section will get you started on working with Commerce pipelines and blocks
Clean up SXC9 Sample Solution and Use It as Staring Point for Your Solution
Sitecore Commerce on-premise installation package comes with a sample solution, which can be found in Sitecore.Commerce.Engine.*.SDK folder (just make sure to use SDK from the correct version of SXC9 :). This walkthrough explains how to get a sample solution up and running on your local workstation. This SDK solution is a good starting point, very much the same as what comes with vanilla SXC9 install (except some of the config files - more on this later).
The easiest way to get your custom Commerce solution started is to follow the below steps:
- Copy Customer.Sample.Solution.sln into your code repository, rename solution file to match your organization and project needs
- Open the solution and remove projects you might not need immediately, for example, I would usually remove the following projects: -- Plugin.Sample.AdventureWorks -- Plugin.Sample.Customers.CsMigration -- Plugin.Sample.InPlaceUpgrade -- Plugin.Sample.Payments.Braintree -- Plugin.Sample.SideBySideUpgrade
- Rename remaining projects and namespaces in all files to match your organization and project needs
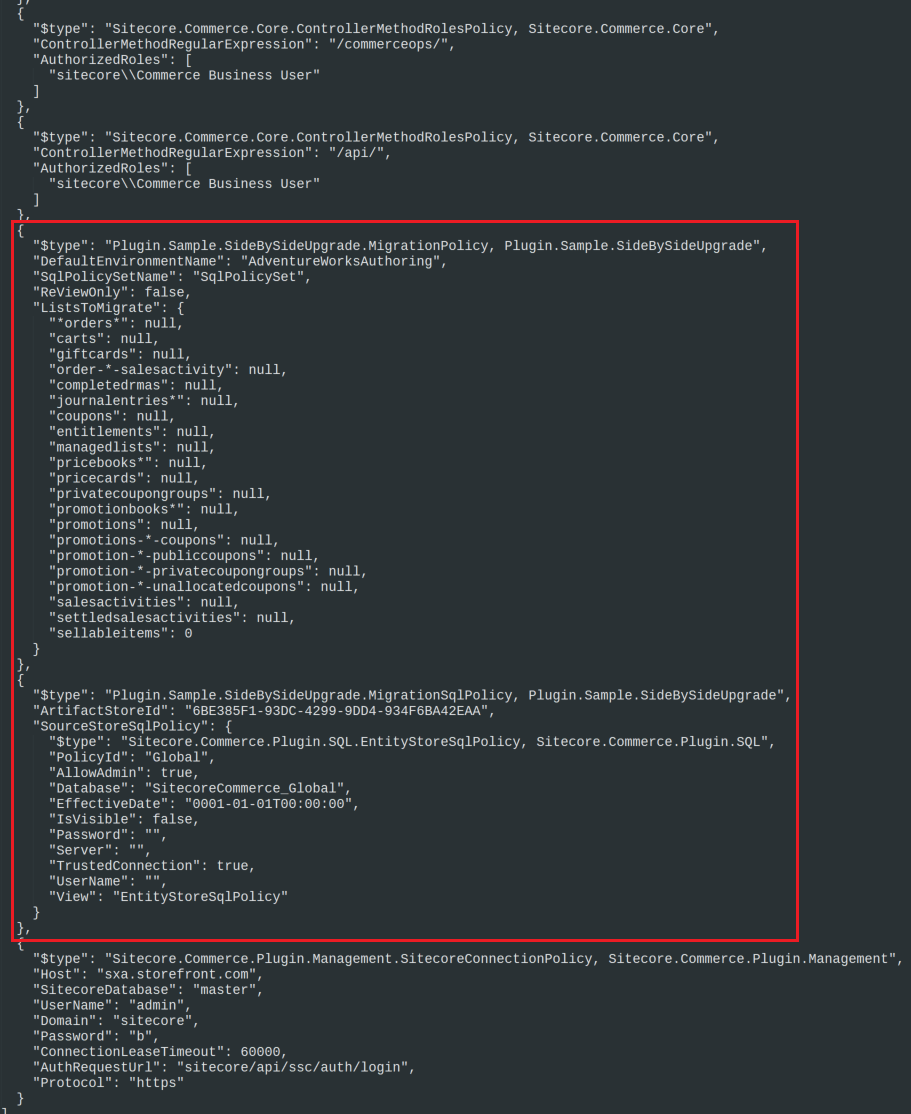
- Find \wwwroot\bootstrap\Global.json file and delete two nodes, related to Plugin.Sample.SideBySideUpgrade.MigrationPolicy (which we deleted from Commerce solution in the above step), as shown on below screenshot
-
Add Your Custom Plugin to Commerce Solution
The process is well documented by Sitecore and others, so I'll skip those steps here: you can follow Sitecore's guide on Creating your first plugin or Google for blogs with more details on this topic.
Run Commerce Engine from Visual Studio
This quick guide from Sitecore describes the process of running Commerce Engine from your Visual Studio and this blog post has more details on the same. Just a couple of extra steps to be aware of:
- Configuration files and policies. The above-mentioned sample Commerce solution comes with a set of config and policy files under [Commerce Engine Project]\wwwroot*, but your local settings, such as SQL or Solr connection strings will be different. You can merge configs with file merge tools or just copy over wwwroot folder from Authoring environment in your local Commerce install into your [Commerce Engine Project]\wwwroot\ with overwrite.
- Development certificate. Just a friendly reminder to make sure you have an SSL certificate under your [Commerce Engine Project]\wwwroot* - the process of creating it is described in the above mentioned blog post.
Deploy Your Solution
Direct deployment from Visual Studio is rather simple and very much the same as with any other ASP.NET core application, this document describes the process. Automated deployment is a topic for another blog post, but long story short, it's not very different from regular web deployments either: create a deployment package with, say, MSBuild and then copy it on top of your vanilla Commerce Install using Octopus Deploy, Visual Studio Online CI process or something similar. The same code would be deployed on all four Commerce Web Roles (Authoring, DevOps, Minions, and Shops), but be careful not to overwrite environment-specific configs and policy files. It's a good idea to exclude all OOTB and environment-specific config and policy files from source control (e.g. add [your Commerce Engine Project Root]/wwwroot/* to repository's .gitignore if you're using git ) and then explicitly include only those config and policy files, which you meant to overwrite (and use config transforms if those files need to be changed based on target environment)
Oh, and one more thing - don't forget to backup all files from webroot of your target environment before pushing your changes, backup is usually a good idea)

